

The most expensive home improvement mistake is starting with the pretty part before the house has been checked for risk. Paint, tile, lights, and hardware matter, but hidden water, weak wiring, bad measurements, and vague contractor scopes can eat the budget before the room looks finished.
The common home improvement mistakes to avoid usually fall into a simple pattern: underestimating what is behind the surface, buying before measuring, trying unsafe work as a weekend project, and skipping the paperwork that protects the job later.
Start With Risk, Not Inspiration
Before choosing finishes, separate low-risk cosmetic work from projects that affect structure, moisture, wiring, plumbing, gas, roofing, or older painted surfaces. That first sort tells you what can be DIY, what needs a permit, and what deserves a professional look before demolition.
A good project plan begins with the unglamorous rooms: basement, attic, crawl space, mechanical closet, panel area, exterior grade, and the wall behind the sink. The drywall patch you can see is less important than the stain line you almost missed.
Use this quick risk sort before you price materials:
| Project Type | Usually DIY-Friendly | Slow Down When | Likely Pro or Permit Trigger |
|---|---|---|---|
| Paint, hardware, shelves | Yes, if surfaces are sound | Paint is peeling in an older home | Lead-safe work may be needed in pre-1978 housing |
| Flooring | Often, for floating floors | Subfloor feels soft, sloped, or damp | Structural repair or moisture remediation |
| Bathroom refresh | Fixtures, paint, accessories | There is staining around tub, toilet, or vanity | Moving plumbing, waterproofing shower assemblies |
| Kitchen update | Cabinet pulls, paint, backsplash with care | Cabinets, appliances, or outlets move | Electrical, plumbing, gas, or ventilation changes |
| Wall changes | Small trim or surface repair | You do not know what the wall carries | Load-bearing walls, headers, electrical reroutes |
That sounds cautious. It is also cheaper than opening a wall on Saturday morning and discovering wiring, mold, or a pipe exactly where the inspiration photo promised open shelving.
“Homeowner pro tips: -don’t open up walls unless you want a project -black contractor bags are great for throwing away things…like tiles *cough, cough* -always get 2-3 quotes for anything over $3k -clogs happen”
– r/homeowners, February 2026 (477 upvotes)
Budget for the Work You Cannot See
A renovation budget should include the visible finish, the hidden prep, and a reserve for surprises. If the estimate only covers the product you want to look at when the job is done, it is probably too thin.
Set aside a contingency before you buy anything fun. For small cosmetic projects, 10% may be enough; for kitchens, baths, old houses, water damage, or work that opens walls, 15% to 25% is a more realistic starting point.
Common hidden costs include permit fees, delivery, disposal, tool rental, extra fasteners, underlayment, primer, caulk, patching compound, replacement shutoff valves, temporary meals, and a second trip to the store because one fitting was wrong. That last trip always happens when your hands are already dirty.
| Budget Mistake | Why It Hurts | Better Habit |
|---|---|---|
| Buying exactly enough flooring or tile | Cuts, breakage, and pattern matching create waste | Buy a waste allowance and keep attic or closet leftovers |
| Ignoring disposal | Old tile, cabinets, carpet, and drywall become a pile fast | Price bags, dump fees, pickup, or a small dumpster early |
| Counting labor but not prep | Leveling, scraping, priming, and patching can take longer than installation | Ask each bidder what prep is included in writing |
| No change-order rule | Small upgrades quietly stack into a different project | Require written approval for cost or schedule changes |
One useful rule: if a change adds money, time, or risk, write it down before the work continues. A text thread is better than memory, but a signed change order is cleaner when the invoice arrives.
Measure the Boring Stuff Before Buying Anything
Bad measurements turn simple home projects into returns, gaps, delays, and awkward compromises. Measure the opening, the clearance, the swing, the slope, the thickness, and the route into the room before buying materials.
Inaccurate measurements show up in predictable places: appliances that cannot pass a tight stair landing, vanities that block a door, refrigerators that cover a light switch, and rugs that look fine online but float strangely in the room. Not dramatic. Annoying.
For cabinets and appliances, measure the space in at least three spots because older walls are rarely perfectly square. For flooring, measure each room separately, then account for cuts, closets, thresholds, and pattern direction.
For tile, dry-lay a few rows before mixing mortar. A half-inch sliver at the tub edge or doorway can make a new project look like a repair.
The safest measuring habit is to write the number, label what it means, and take a photo with the tape measure visible. “Bathroom 31 7/8 inches clear width” is better than a lonely number in a notes app.
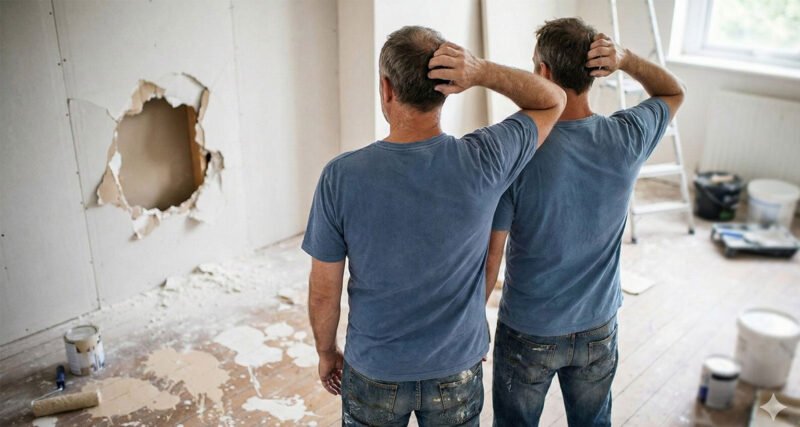
Know Which DIY Jobs Should Stay Small

DIY is smart when the mistake is visible, reversible, and unlikely to harm the house. DIY becomes risky when the work is hidden, energized, pressurized, structural, wet, hot, or difficult to inspect once covered.
Painting a bedroom badly costs time and another gallon. Wiring a circuit badly can create a fire risk inside a wall, and that is a different category of mistake.
The National Fire Protection Association electrical safety checklist focuses on hidden hazards, damaged cords, overheated outlets, and safe electrical use. For homeowners, the practical takeaway is simple: cosmetic electrical swaps are not the same as adding circuits, moving boxes, or working inside a panel.
Use this decision rule:
- DIY if the work is surface-level, easy to undo, and does not affect a system.
- Pause if you need to cut into a wall, ceiling, floor, roof, or exterior envelope.
- Call a qualified pro if the project touches load-bearing framing, gas, major plumbing, electrical panels, service lines, or waterproofing.
- Check local permit rules before assuming “small” means exempt.
There is no shame in doing the prep and hiring out the risky step. I still think the best DIYers are the ones who know exactly where their confidence should stop.
Do Not Skip Permits, Lead Rules, or Insurance Checks
Permits, lead-safe rules, and insurance checks feel like paperwork until something fails, leaks, burns, or gets questioned during resale. Skipping them may save time at the start and create a more expensive problem later.
Permit rules vary by city and county, so the safest move is to ask the local building department before you move plumbing, add electrical work, alter structure, replace major mechanical systems, or build exterior improvements. A five-minute call can save a failed inspection.
For older homes, paint deserves special attention. The U.S. Environmental Protection Agency Renovation, Repair and Painting Program explains that pre-1978 homes may involve lead-safe renovation requirements when painted surfaces are disturbed.
That does not mean every old-house project is impossible. It means sanding, scraping, demolition, and dust control need to be planned like safety work, not just prep work.
Insurance is another overlooked checkpoint. Before roof work, plumbing changes, electrical upgrades, major renovations, or projects done by a contractor, confirm what your policy requires and whether the contractor carries proper coverage.
Hire Contractors With a Written Scope
A contractor decision should be based on scope, license status, insurance, communication, references, payment terms, and the actual people doing the work. The lowest bid is not automatically bad, but it is incomplete until you know what it excludes.
Get at least two or three quotes for larger work and compare them line by line. If one quote is dramatically cheaper, ask whether demolition, disposal, permits, finish materials, patching, cleanup, and warranty are included.
A strong written scope names the project area, materials, prep, protection, start conditions, cleanup, payment schedule, change-order process, and what happens if hidden damage appears. Vague language usually becomes a disagreement after the job is messy.
Ask these questions before signing:
- Who is responsible for permits and inspections?
- Who buys finish materials, and when do they need to be on site?
- How will floors, cabinets, landscaping, and adjacent rooms be protected?
- What is excluded from the price?
- How are change orders approved?
- What payment is due before work begins, during work, and at completion?
The daily communication rhythm matters too. A five-minute check-in before everyone leaves can catch a wrong grout color, outlet height, cabinet pull layout, or tile direction before it becomes permanent.
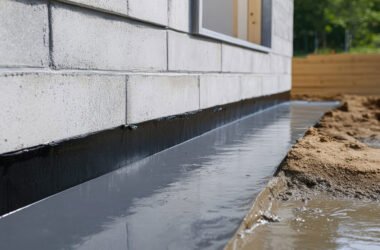
Protect Drainage, Landscaping, and the Parts of the House You Are Not Touching
Home improvement can accidentally damage the parts of the house that were working fine. Protect floors, vents, landscaping, drainage paths, gutters, siding, and foundation grade before materials, debris, or equipment start moving through the property.
Water management deserves its own pause. The Federal Emergency Management Agency recommends landscaping and grading choices that help channel runoff away from the home, which is especially relevant before patios, beds, hardscape, or downspout changes.
A beautiful planting bed can still be a mistake if it traps water against the foundation. Mulch should not hide a negative slope, and a new patio should not send rain toward a basement window.
“When moving into a new house, wait a year or a few seasons before making drastic changes to the landscaping. You will want to see what happens when your yard experiences different situations/seasons to ensure your changes won’t negatively impact your house.”
– r/Homebuilding, August 2025 (27 upvotes)
That is unusually good advice for a first year in a house. Watch where snow melts, where rain pools, which rooms get humid, where leaves clog, and which shrubs scrape siding before making permanent exterior changes.
Slow Down Before Finishes
The finish stage is where rushed decisions become visible every day. Before paint, tile, trim, fixtures, or cabinet hardware go in, verify layout, clearances, backing, waterproofing, lighting, and photos of hidden work.
Take pictures before closing walls or covering floors. Photograph plumbing routes, electrical locations, blocking, insulation, waterproofing, and any repair you may need to find again.
Walk the space like you live there. Open cabinet doors, stand at the sink, swing the bathroom door, pull a chair away from the table, turn lights on from every entrance, and check where towels, trash cans, chargers, and cleaning supplies will actually go.
Small mockups help. Tape the vanity outline on the floor, mark sconce height on painter’s tape, place a scrap of tile against the trim, or hold the cabinet pull where your hand naturally reaches.
These checks feel fussy until they prevent the weird little problems you notice forever. A switch behind a refrigerator is not a design tragedy, but you will mutter at it for years.
Pre-Demolition Checklist
A pre-demolition checklist catches many common home improvement mistakes to avoid before dust, noise, and urgency take over. Run it before removing cabinets, flooring, tile, drywall, fixtures, shrubs, or exterior surfaces.
- Confirm whether the project needs a permit or inspection.
- Check for lead risk if the home was built before 1978.
- Shut off water, power, or gas only when you understand the system and the safe procedure.
- Locate shutoff valves, breakers, cleanouts, vents, and access panels.
- Photograph the room from every angle before work starts.
- Protect floors, doors, HVAC returns, and nearby furniture.
- Plan debris removal before the debris exists.
- Keep children and pets away from work zones, dust, tools, and open materials.
- Do not cover hidden work until required inspections and your own photos are complete.
The list is boring on purpose. Good renovation often depends on boring things happening in the right order.
FAQ
What are the most common home improvement mistakes to avoid?
The most common home improvement mistakes to avoid are underbudgeting, poor measuring, unsafe DIY electrical or plumbing work, skipping permits, hiring from a vague quote, and starting finishes before hidden problems are checked.
How much extra should I budget for home improvement surprises?
Plan roughly 10% extra for small cosmetic work and about 15% to 25% for kitchens, baths, older homes, water damage, or projects that open walls. The less you can see before starting, the larger the reserve should be.
Which home improvement projects should not be DIY?
Avoid DIY work that affects load-bearing structure, electrical panels, new circuits, gas lines, major plumbing moves, roofing, waterproof shower assemblies, or lead-contaminated dust control. Cosmetic work is one thing; hidden system work is another.
Do small home improvement projects need permits?
Some small projects need permits if they affect structure, electrical, plumbing, mechanical systems, exterior work, or safety. Rules are local, so call your building department before assuming a weekend project is exempt.
Should I renovate right after buying a house?
Cosmetic fixes can happen right away, but major layout, landscaping, drainage, and expensive built-in decisions are often better after living in the house through daily routines and at least some seasonal weather.
Final Judgment
The smartest way to avoid renovation regret is to slow the project down before the irreversible steps. Measure first, price the hidden work, respect water and wiring, write the scope, and let the house show you its problems before you cover them with something pretty.
That is the practical heart of common home improvement mistakes to avoid: the mistake is rarely wanting a nicer home. It is pretending the house is simpler than it is.