



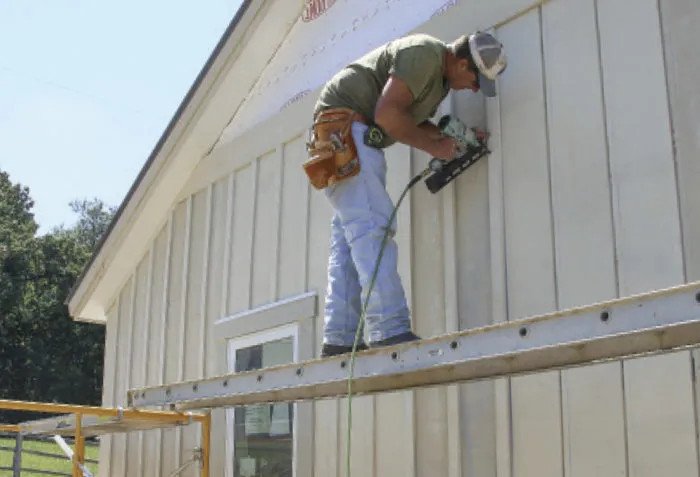
According to Best Areas Invest Las Vegas, installing board and batten siding is a different project from installing horizontal lap siding. The boards run vertically. The battens, narrow strips of wood or fiber cement, cover the seams between the boards. The pattern is alternating wide board, narrow batten, wide board, narrow batten, repeating across the wall. The installation sequence is boards first, battens second. The boards are spaced with a gap between them. The battens cover the gap and are nailed to only one of the two adjacent boards so the boards can expand and contract independently without cracking the battens. This single-nail rule, each batten fastened to one board only, is the detail that separates a board and batten wall that stays flat for decades from one where every batten splits down the middle after the first season.
Board and batten siding can be made from wood, fiber cement, engineered wood, or vinyl. The material determines the fasteners and the gap sizes. The layout is the same regardless of material. The boards are typically one-by-ten or one-by-twelve, meaning they are three-quarters of an inch thick and nine and a quarter or 11 and a quarter inches wide in their actual dimensions. The battens are one-by-two or one-by-three. The boards are spaced with a gap of roughly half an inch to three-quarters of an inch between them. The batten, typically two to three inches wide, covers the gap with roughly three-quarters of an inch of overlap on each side. The layout must be planned so that the boards land evenly at corners, windows, and doors. An awkwardly narrow board at the end of a wall looks like a mistake. A thoughtfully planned layout makes the wall look intentional.
Step 1: Plan the Layout Before the First Board Goes Up
The layout of board and batten siding is determined by the board width and the desired spacing. A one-by-ten board with a half-inch gap and a two-inch batten produces a repeat of 11 and a half inches from the center of one batten to the center of the next. The total width of the wall divided by the repeat tells you how many boards you need. Adjust the board spacing slightly, a quarter inch per gap across the entire wall, so the boards at the corners are full width or close to it. A half-inch adjustment spread across 20 gaps is invisible. A two-inch strip of board at a corner is the first thing anyone sees.
Mark the centerline of every board on the wall sheathing before installing any boards. The marks guide the board placement and ensure the battens land where the gaps are. The marks are critical because once the boards are up, the gaps are hidden behind the battens and you cannot see where the edges of the boards are. The centerline marks tell you where to nail and where not to nail when installing the battens.
Start the layout from the most visible corner, typically the front corner of the house. Work around the house from that corner. At inside corners, the board from one wall butts against the board from the adjacent wall. At outside corners, the boards can be mitered, butted with a corner trim board, or overlapped with one board extending past the corner and the adjacent wall board butting into it. The corner treatment is a design decision. Mitered corners look the cleanest and require the most skill. Corner trim boards are the easiest and look traditional. Overlapped corners are the simplest and look rustic.
Step 2: Install the Boards
Install the boards from the bottom up or the top down. Bottom-up is more common because the bottom board rests on the starter strip and each board above it rests on the board below. Top-down allows you to work with gravity but requires blocking between studs to support the bottom of each board. Bottom-up is the standard method for wood and fiber cement board and batten.
Fasten each board with a single nail or screw in the center of the board at each stud or horizontal blocking location. The single fastener in the center allows the board to expand and contract across its width without restraint. A board fastened with two nails, one near each edge, will cup as it expands because the edges are restrained but the center is not. The single center nail allows the board to move symmetrically. For boards wider than 12 inches, two fasteners may be required to prevent cupping. Space them evenly, not near the edges.
The gap between boards must be consistent. Use a spacer block of the correct width, half an inch to three-quarters of an inch, to set the gap between each board. Check the gap with the spacer as you install each board. An inconsistent gap produces battens that are centered over some gaps and offset over others. The inconsistency is visible in the finished wall.
For fiber cement board and batten, the boards are HardiePanel or a similar product cut into strips, or purpose-made fiber cement board and batten planks. The fasteners are corrosion-resistant roofing nails or siding nails driven flush. The gap between boards is one-eighth of an inch to allow for the minor expansion of fiber cement. The standard half-inch board gap used for wood is not necessary for fiber cement because the material expands less.
Step 3: Install the Battens
The battens cover the gaps between the boards. Each batten is centered over a gap and nailed to one of the two adjacent boards, not both. Nailing to both boards prevents the boards from moving independently. When the boards expand, they push against the batten. If the batten is nailed to both boards, the batten splits. If the batten is nailed to one board only, the other board can slide freely behind the batten. The batten is nailed to the board on the right or the board on the left, consistently across the entire wall. Pick a side. Right or left. Nail every batten to that side.
The battens are face-nailed with two nails per batten at each stud or horizontal blocking location. The nails must be long enough to penetrate through the batten, through the gap, and into the structural framing behind the board. A batten nailed only into the board with no penetration into the framing will eventually work loose as the board expands and contracts. The nail must go through the gap and into the stud.
The bottom of the batten should be held slightly above the bottom edge of the boards, roughly a quarter inch, to prevent water from wicking up into the end grain of the batten. The top of the batten butts into the soffit or frieze board with a gap for expansion. The gap at the top is caulked or left open depending on the climate and the material.
Material-Specific Installation Notes
Wood board and batten is the traditional material. Use cedar, redwood, or pressure-treated pine. Cedar and redwood are naturally rot-resistant and can be left unpainted to weather to a silver-grey, or stained. Pressure-treated pine must be painted or stained. Wood boards must be back-primed, painted on the back face as well as the front, before installation. Back-priming prevents the boards from cupping by equalizing moisture absorption on both faces. A board that absorbs moisture on the front face and not the back will cup toward the wet side. Back-primed boards cup less.
Fiber cement board and batten is installed with the same fasteners, gaps, and techniques as fiber cement lap siding. The boards are blind-nailed or face-nailed depending on the product. The battens are face-nailed. The gaps are one-eighth of an inch. The fasteners are corrosion-resistant. The boards and battens must be painted after installation. Factory-primed fiber cement requires finish paint. Factory-finished fiber cement does not.
Engineered wood board and batten, such as LP SmartSide, is installed with the manufacturer’s specified fasteners and gaps. The installation is similar to fiber cement. The material is lighter and can be cut with standard woodworking tools. Follow the manufacturer’s instructions for gap sizes, which vary by product.
Frequently Asked Questions
Why are battens nailed to only one board?
Wood expands and contracts with changes in humidity. A board that is restrained at both edges will cup or crack. Nailing the batten to one board only allows the other board to move freely behind the batten. The batten covers the gap and hides the movement. The movement is invisible. Nailing the batten to both boards restrains both boards, and when they expand, the batten splits. The split is visible and permanent.
How much gap should be between the boards?
For wood boards, a gap of half an inch to three-quarters of an inch is standard. The gap allows the boards to expand across their width without pushing against each other. For fiber cement boards, a gap of one-eighth of an inch is sufficient because fiber cement expands less than wood. The gap must be wide enough that the boards will not touch when they are at their maximum width due to humidity. Boards that touch will buckle outward. The gap is hidden behind the batten and can be wider than strictly necessary without affecting the appearance.
What is the best material for board and batten siding?
Cedar is the traditional choice and the most beautiful when left to weather naturally. Fiber cement is the most durable and requires the least maintenance over the long term but is heavier and harder to install. Engineered wood splits the difference: it looks like wood, installs with woodworking tools, and costs less than fiber cement. The best material is the one that fits the budget, the climate, and the desired maintenance schedule.
The Bottom Line
Board and batten siding is boards installed vertically with a gap between them, covered by battens nailed to one side of each gap. The layout is planned before the first board goes up. The centerlines are marked on the sheathing. The boards are fastened with a single nail in the center. The battens are nailed to one board only, with the nails going through the gap into the studs. The material choice, wood, fiber cement, or engineered wood, determines the gap size and the fasteners. The layout and the single-nail rule are the same regardless of material. A board and batten wall that follows these rules will stay flat and crack-free for the life of the siding. One where the battens are nailed to both boards will split every batten within a year.