



Installing HardiePlank siding is installing the most common fiber cement lap siding product in North America. HardiePlank is James Hardie’s lap siding, available in widths from four and a quarter to 12 inches, in smooth or cedar-grain texture, and in primed or ColorPlus factory-finished versions. The installation is blind nailing through the top edge, one-and-a-quarter-inch minimum overlap, one-eighth-inch gaps at all trim and butt joints, and flashing behind every butt joint. The techniques are the same as any fiber cement lap siding. The HardiePlank-specific details are the exposure calculations for each plank width, the use of a Gecko gauge to hold the plank while nailing, and the specific flashing requirements at joints.
HardiePlank is a product, not a category. It installs according to the James Hardie installation manual for the specific climate zone, HZ5 or HZ10, that the product is rated for. The manual is the final authority. This guide covers the techniques that the manual assumes you already know: how to calculate the exposure, how to use the tools that make the installation faster and more accurate, and how to handle the details at butt joints and inside corners that the manual shows in a diagram but does not explain in depth.
Exposure Calculation and Wall Layout
The exposure of HardiePlank is the visible width of each plank after the overlap. The minimum overlap is one and a quarter inches. The exposure is the plank width minus the overlap. A six-and-a-quarter-inch plank has a five-inch exposure. An eight-and-a-quarter-inch plank has a seven-inch exposure. The exposure determines how many courses are needed to cover the wall height.
Divide the wall height by the exposure to find the number of courses. The result will almost never be a whole number. Adjust the exposure slightly so the courses land evenly. The adjustment should be spread across all courses. A quarter-inch adjustment per course spread across 20 courses is invisible. A two-inch adjustment concentrated in the top course is an obvious mistake. The adjusted exposure must still meet the minimum overlap requirement. If the adjusted exposure would reduce the overlap below one and a quarter inches, you need a different plank width or a different layout strategy.
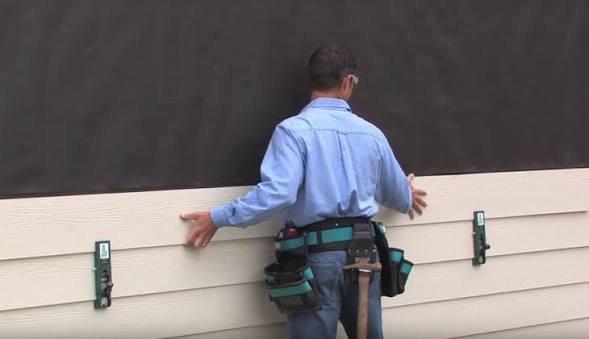
Snap horizontal chalk lines at every course. The chalk lines mark the bottom edge of each plank. The bottom edge of the plank rests on the top edge of the plank below. The chalk line is the reference for placing the plank. A Gecko gauge or a pair of spring clamps holds the plank in position while you nail it. The gauge clamps onto the plank below and supports the plank you are installing at the correct exposure. Without a gauge, you hold the plank with one hand and nail with the other, which is possible but slower and less accurate. The Gecko gauge costs $30 to $40 and is the tool that makes a one-person HardiePlank installation practical.
Blind Nailing and Fastener Placement
HardiePlank is blind-nailed. The nails are driven through the top edge of the plank, roughly three-quarters of an inch down from the top, where they will be covered by the bottom edge of the next plank above. The nails must be hot-dipped galvanized or stainless steel. Electroplated nails are not acceptable. The nails must penetrate a minimum of one and a quarter inches into the studs. Sixpenny or eightpenny siding nails are the standard.
Nail at every stud. The stud spacing, typically 16 inches on center, determines the nail spacing. The nail must hit the stud. A nail that misses the stud and goes only into the sheathing has inadequate holding power for the weight of HardiePlank. Locate the studs before installing the siding. Mark the stud locations on the sheathing or snap vertical chalk lines. The marks will be covered by the siding but you will know where they are when you are nailing.
The nail head must be flush with the surface of the plank. Do not countersink. A countersunk nail dimples the plank and creates a stress concentration where the plank can crack. Do not leave the nail proud. A proud nail prevents the next plank from seating properly and creates a shadow line. Flush means the nail head is exactly even with the plank surface. A pneumatic nailer with adjustable depth control makes consistent flush nailing easier than a hammer. Set the depth on a piece of scrap before starting on the wall.
Butt Joints, Flashing, and Inside Corners
Butt joints between HardiePlank pieces must be gapped one-eighth of an inch and flashed behind the joint. The flashing is a piece of aluminum, galvanized steel, or painted metal, four to six inches wide, slipped behind the joint before the next piece is installed. The flashing prevents water that penetrates the joint from reaching the sheathing. The joint is caulked with elastomeric caulk after installation. For ColorPlus factory-finished siding, use the James Hardie color-matched caulk. For primed siding, use paintable elastomeric caulk that will be covered by the finish paint.
Butt joints must land on a stud. Both ends of both pieces must be fastened into the stud. The joint is centered on the stud with the gap falling over the centerline. The flashing extends past both edges of the joint. Stagger the butt joints between courses so no two joints line up vertically. A continuous vertical line of joints is a weak line in the wall and a path for water. Staggered joints distribute loads and break the water path.
Inside corners on a HardiePlank wall can be finished three ways. A trim board installed in the corner, with the siding from both walls butting into it with a one-eighth-inch gap, is the simplest and most traditional. A metal inside corner flashing, with the siding from one wall running behind the flashing and the siding from the other wall butting into it, is more watertight. An overlapping corner, where the siding from one wall extends past the corner and the siding from the other wall butts into the back of it, is the least common and most rustic. The trim board method is the standard for residential HardiePlank installations.
Frequently Asked Questions
Is a Gecko gauge worth buying for HardiePlank installation?
Yes, for a whole-house installation. The Gecko gauge holds the plank at the correct exposure while you nail it, turning a two-person job into a one-person job for the plank hanging stage. It costs $30 to $40. For a small project, a shed or a single wall, two people and no gauge is fine. For a whole house, the gauge pays for itself in labor savings on the first wall.
Should I use a hammer or a pneumatic nailer for HardiePlank?
A pneumatic nailer with adjustable depth control is faster and produces more consistent flush fasteners than a hammer. The depth control is the key feature. Set it once on a scrap piece and every nail will be flush. A hammer requires judging the depth on every nail. For a whole house, the nailer is worth the rental or purchase cost. For a small project, a hammer is sufficient.
Do I caulk every gap on HardiePlank siding?
Caulk the butt joints and the gaps between the siding and trim. Do not caulk the bottom edge of the siding above grade. The bottom gap must remain open to allow drainage. Do not caulk the overlap between courses. The overlap is designed to shed water without caulk. Caulking the overlap traps water behind the caulk. The water that gets in cannot get out.
The Bottom Line
HardiePlank lap siding is blind-nailed to the studs, overlapped a minimum of one and a quarter inches, and gapped one-eighth of an inch at all trim and butt joints. The exposure is calculated by dividing the wall height by the plank width minus overlap and adjusting slightly for even courses. The Gecko gauge holds the plank at the correct exposure. The nails are driven flush at every stud. The butt joints are flashed and caulked. The inside corners are trimmed. HardiePlank is a specific product with specific installation requirements. Follow the manual for your climate zone. The techniques in this guide are the techniques the manual assumes you know.