



Painting window trim is the finishing step that makes a room look clean and finished, or sloppy and rushed, depending on how carefully the paint meets the glass, explains Attract Retain Long Term Tenants. The trim is the casing around the window, the stool at the bottom, and the apron underneath. It is the most detailed paint work in a room because of the number of edges, corners, and transitions between wood and glass. The difference between a professional-looking paint job and one that looks like it was done by a previous owner in a hurry is entirely in the preparation and the cut line at the glass. A clean, straight line where the paint meets the glass, with no paint on the glass and no unpainted wood showing, is the mark of a careful painter. It takes an extra 30 seconds per window and it is the first thing anyone notices.
The paint on window trim takes more abuse than the paint on walls. It is touched by hands opening and closing the window. It is exposed to condensation on the glass. It is blasted by sunlight through the glass. It must be a durable, washable paint. Semi-gloss or satin enamel is the standard for interior trim. The sheen resists dirt and moisture and can be wiped clean. Flat paint has no place on window trim. It will absorb hand oils and condensation and look dirty within months.
ENERGY STAR notes that properly sealed windows contribute to home energy efficiency. Painting window trim includes inspecting the caulk and paint seal between the trim and the window frame. A cracked paint line is a sign of air movement. Repainting is an opportunity to recaulk gaps and improve the air seal around the window.
Step 1: Prepare the Surface
Clean the trim. Wash with a mild detergent and water to remove dirt, dust, and hand oils. The paint will not adhere to a dirty surface. Rinse with clean water and let the trim dry completely. Sand the trim lightly with 120-grit sandpaper to scuff the surface and provide a mechanical bond for the new paint. Sanding also smooths out any roughness, drips, or brush marks from the previous paint job. Wipe off the sanding dust with a tack cloth or a damp rag.
Fill any holes, cracks, or dents with wood filler or spackling compound. Old nail holes, cracks at mitered corners, and gouges from years of use should be filled and sanded smooth. The filler must be dry before sanding. Sand the filled areas flush with the surrounding surface. The trim should feel smooth to the touch. Any imperfection you can feel will be visible under the new paint.
Check for lead paint if the house was built before 1978. Sanding lead paint creates lead dust that is hazardous, particularly to children. Use a lead test kit available at hardware stores. If lead is present, do not sand. Use a liquid deglosser to prepare the surface for paint without creating dust. Encapsulate the old paint under new paint rather than removing it.
Step 2: Prime Bare Wood and Apply Paint
Prime any bare wood. Areas where the old paint was scraped or sanded down to raw wood must be primed before painting. Use an oil-based or shellac-based primer for the best adhesion and stain blocking. Water-based primer is adequate for clean, unstained wood. The primer seals the wood and provides a uniform surface for the finish paint. Let the primer dry completely.
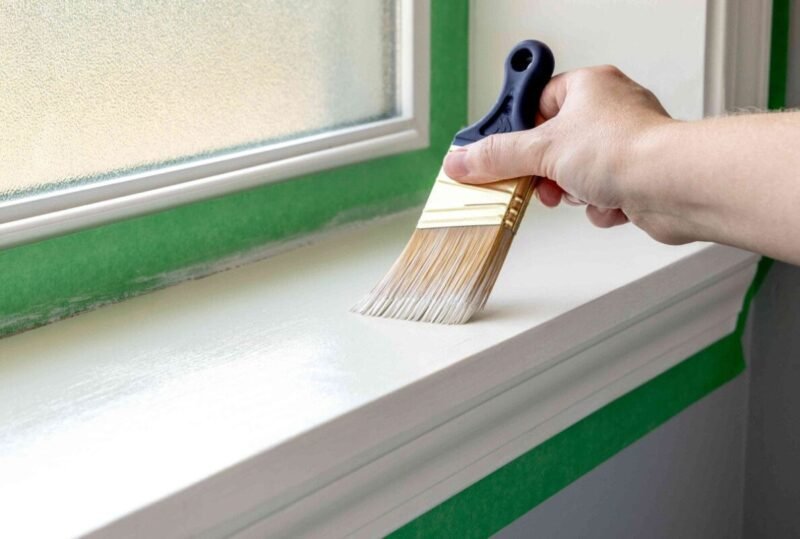
Paint the window frame first, the narrow surfaces around the sashes, before painting the wider casing. The frame paint may get on the casing, but the casing paint will cover it. The sequence is from the inside out: window frame first, then the casing. Use a two-inch angled sash brush for the narrow surfaces. An angled brush allows you to paint a straight line where the wood meets the glass without taping.
Cutting in at the glass is the technique that determines how the finished job looks. Load the brush with paint. Tap off the excess on the side of the can. Do not wipe the brush on the rim. Place the brush against the glass at a slight angle, with the tip of the bristles touching the glass. Draw the brush along the glass, letting the bristles ride against the glass as a guide. The paint should extend onto the glass by roughly a sixteenth of an inch. This slight overlap seals the joint between the wood and the glass and prevents moisture from getting behind the paint. The line does not need to be perfectly straight because the slight paint-on-glass overlap is intentional and functional, not an error.
After the frame is painted, paint the casing, the stool, and the apron. Use a two-and-a-half-inch straight brush for the wider surfaces. Lay the paint on smoothly with long, even strokes. Work from dry areas into wet areas to avoid lap marks. Do not over-brush. The paint should be applied and left to level. Over-brushing creates brush marks, thins the paint film, and can pull the paint off the surface.
Apply two coats for full coverage and durability. The first coat may look uneven, particularly over a darker color or a patched area. The second coat evens out the color and builds the film thickness that protects the wood. Sand lightly between coats with 220-grit sandpaper for the smoothest finish. Wipe off the dust before applying the next coat.
Frequently Asked Questions
Should I tape the glass or cut in by hand?
Cutting in by hand is faster and produces a better result for an experienced painter. The slight paint-on-glass overlap seals the wood-to-glass joint. Tape must be applied perfectly straight, which takes time, and must be removed before the paint dries to avoid peeling the paint film. For a homeowner painting a few windows, tape is a reasonable alternative if the hand-cutting technique is not yet developed. Use painter’s tape designed for delicate surfaces. Apply it to the glass, leaving a sixteenth-inch gap between the tape and the wood so the paint can seal the joint. Remove the tape while the paint is still wet.
Should I paint the window sashes?
If the window sashes are wood and are painted the same color as the trim, paint them the same way as the frame. If the sashes are vinyl or aluminum, do not paint them. Paint does not adhere well to vinyl and will peel. If the sashes are a different color than the trim, mask them off and paint the trim only.
Can I paint latex trim paint over old oil-based paint?
Yes, if the surface is properly prepared. Sand the old oil-based paint to scuff the surface and provide a mechanical bond. Apply a bonding primer designed for adhesion to glossy surfaces. Paint with latex enamel over the primer. Latex applied directly to glossy oil paint without sanding or primer will peel. The preparation is the bond. The primer is the insurance.
The Bottom Line
Painting window trim is preparation, priming, and two coats of semi-gloss or satin enamel applied in the right sequence. The cut line at the glass should extend slightly onto the glass to seal the wood-to-glass joint. The paint extends the life of the wood by protecting it from moisture, hand oils, and sunlight. A repainted window trim makes the entire room look cleaner and the window look newer.