Installing fiber cement siding is the same fundamental process whether the siding is lap planks, vertical panels, or individual shingles. The fasteners, the gaps, the flashing, and the caulking are the same across all three profile types. What changes is the layout, the starter strip, and the way the courses stack. Lap siding is horizontal planks that overlap like clapboard. Panel siding is four-by-eight or four-by-ten sheets installed vertically with a batten covering the seam. Shingle siding is individual rectangles, typically 12 by 24 inches, installed in courses like roofing shingles. The material is the same. The installation pattern is different, and the difference is what this guide covers.
Lap Siding: The Standard Horizontal Installation
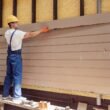
Fiber cement lap siding is the most common profile. The planks are five-sixteenths of an inch thick, available in widths from four to twelve inches, and installed horizontally starting from the bottom. Each course overlaps the course below by at least one and a quarter inches. The overlap is what sheds water. The manufacturer specifies the minimum overlap for each plank width. A wider plank has a larger overlap. A narrower plank has a smaller overlap. Follow the manufacturer’s specification printed on the bundle wrapper. The overlap is not a suggestion. It is the engineered drainage plane for that specific product.
The starter strip for lap siding can be a piece of the same fiber cement plank installed upside down at the bottom of the wall, a wood furring strip the same thickness as the top edge of the plank, or a metal starter strip sold by the siding manufacturer. The starter strip kicks the bottom of the first course out so it hangs at the same angle as the overlapping courses above. Without the starter strip, the first course hangs flat against the wall and the overlapping courses angle outward, creating a visible flare at the bottom of the wall. The starter strip is the foundation of the lap siding system. Install it level. Every course above it references the starter.
The exposure, the visible width of each plank after the overlap, determines the number of courses. A six-and-a-quarter-inch plank with a one-and-a-quarter-inch overlap has a five-inch exposure. An eight-and-a-quarter-inch plank with the same overlap has a seven-inch exposure. Plan the layout so the top course lands at the correct height without needing to be ripped to a narrow width. The layout is determined before the first plank is installed. Snap horizontal chalk lines at every course. The chalk lines keep the courses parallel and the exposure consistent. An inconsistent exposure is visible from across the street as a wavy pattern in the wall.
Panel and Shingle Siding: Vertical and Modular Patterns
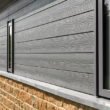
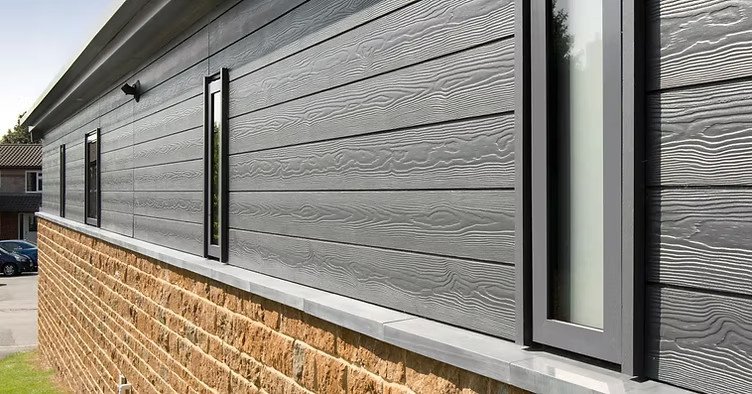
Fiber cement panel siding is installed vertically. The panels are four feet wide and eight, nine, or ten feet long. The vertical seams between panels are covered with a batten, a narrow strip of fiber cement or wood trim, nailed over the seam. The seam itself is flashed behind the batten with house wrap tape or metal flashing. The batten is both the decorative cover and the water management system. The bottom edge of the panel must be held six inches above grade. The top edge butts into the soffit or trim with a one-eighth-inch gap.
Panel siding can also be installed with the seams expressed as a reveal, where the panels are gapped one-eighth of an inch and the gap is caulked and painted, with no batten. The reveal method is less common and requires perfectly straight panel edges. Any waviness in the cut edge is visible in the finished wall. The batten method is more forgiving and more traditional. It also provides better water management because the batten shields the seam from direct rain exposure.
Fiber cement shingle siding, sometimes called shake siding, is installed in courses like roofing. Each shingle overlaps the shingle below, and the vertical joints are staggered from course to course. The shingles are face-nailed with two nails per shingle, placed high enough that the next course covers the nail heads. The exposure, the visible portion of each shingle, is typically seven to eight inches depending on the shingle size and the desired look. The starter course at the bottom is a double course, one shingle on top of another, to create the same angle as the overlapping courses above. The layout must be planned so the courses land evenly at the top of the wall. Cutting the top course of shingles to a narrow strip looks awkward. Adjust the exposure slightly across the height of the wall so the top course is a full or nearly full shingle.
Field Finishing: Painting Primed Fiber Cement
Primed fiber cement siding must be painted after installation. The primer protects the plank during storage and installation. It is not a finish coat. The finish paint is applied within 90 days of installation for most manufacturers. Leaving primed siding unpainted for longer than the manufacturer’s specified window may require re-priming or washing before painting.
Paint the siding with 100 percent acrylic latex exterior paint. Apply two coats. The first coat can be sprayed and back-rolled. The second coat is applied by spray, brush, or roller. Back-rolling forces the paint into the wood-grain texture on the surface of the siding. Spraying alone leaves paint bridging across the texture without filling the low spots. The paint fails at the thin spots first. Back-rolling eliminates the thin spots. Paint the bottom edge of each course, the part visible in the overlap shadow, with a brush before the planks go on, or accept that the bottom edge will be the color of the primer when viewed from below.
Do not paint fiber cement when it is wet, when the temperature is below 35 degrees, or when the plank surface is hot from direct sun. Paint applied to a hot surface skins over before it bonds to the substrate. The paint peels within a year. Paint early in the morning when the wall is cool, or on an overcast day. The paint manufacturer’s temperature range is printed on the can. Follow it.
Frequently Asked Questions
How do I calculate the exposure for fiber cement lap siding?
Subtract the minimum overlap from the plank width. A six-and-a-quarter-inch plank with a one-and-a-quarter-inch overlap has a five-inch exposure. Divide the wall height by the exposure to determine the number of courses. Adjust the exposure slightly so the top course does not need to be ripped to a narrow width. The adjustment should be spread across all courses, not concentrated in one. A quarter-inch adjustment per course across 20 courses is invisible. A two-inch adjustment in the top course alone is obvious.
Should I use panel siding or lap siding?
Panel siding is faster to install on large walls with few openings. A four-by-eight panel covers 32 square feet in one piece. Lap siding in the same area requires 10 to 15 planks. Panel siding looks more modern. Lap siding looks more traditional. Panel siding has more seams to manage because the vertical joints between panels must be flashed and battened. Lap siding has more courses to install but fewer vertical joints. The choice is aesthetic and practical. For a wall with many windows and doors, lap siding is easier because the short pieces between openings are simpler to handle than cutting panels to fit around multiple openings.
Can I touch up scratches on factory-finished fiber cement?
Yes. The manufacturer supplies touch-up paint in matching colors. The touch-up paint is included with the siding order or sold separately. Light scratches can be touched up with a small brush. Deep scratches that expose bare fiber cement must be primed before touch-up. The touch-up paint is not as durable as the factory finish. A touch-up on a prominent wall may be visible from certain angles. For a deep scratch on a highly visible wall, replacing the damaged plank is the better repair.
The Bottom Line
Fiber cement siding comes in three profiles: lap, panel, and shingle. Lap siding is the standard, installed horizontally with a starter strip and a minimum overlap. Panel siding is faster on large walls, with seams covered by battens. Shingle siding is face-nailed in courses with staggered joints. All three profiles use the same fasteners, the same gaps, the same flashing principles, and the same paint. The profile determines the layout. The layout determines the number of cuts and the amount of time the job takes. Choose the profile that fits the house and the budget. Install it according to the manufacturer’s instructions. Paint it within the specified window. The siding will outlast you.