



To waterproof a basement, stop the water at its source and escalate fixes by severity says Frisco Management. Start with cheap exterior work like regrading soil and extending downspouts, move to interior sealants and crack repair for minor seepage, and reserve interior drainage systems or full exterior excavation for chronic flooding. Most leaks are solved outside the house, not inside it.
The instinct is to grab a bucket of waterproof paint and roll it onto the walls. Sometimes that works. Often it hides the problem for a season and lets it come back worse. The smarter path costs less and lasts longer, and it begins with figuring out where the water is actually getting in.
Find Where the Water Is Coming From First
Before spending a dollar, diagnose the moisture. Basement dampness comes from two very different problems: condensation forming on cool surfaces, or seepage pushing through the walls and floor. The fix for each is the opposite, so guessing wastes money.
Run the plastic-sheet test. Tape a one-foot square of clear plastic tightly to the wall and leave it for 24 hours. Beads on the room-facing side mean condensation, which a dehumidifier and better ventilation can handle. Moisture trapped behind the plastic means water is migrating through the masonry, and that needs real waterproofing.
Read the warning signs while you are down there. A chalky white crust on the block, called efflorescence, is mineral salt left behind by water that already passed through the wall. Watch for musty odors, peeling paint, rust stains, and cracks. Hairline cracks are usually cosmetic; horizontal or stair-step cracks wider than a quarter-inch can signal structural movement worth a professional look.
The U.S. Environmental Protection Agency advises keeping indoor relative humidity between 30 and 60 percent to discourage mold growth, and basements routinely run higher. That chalky streak on the block is the wall quietly telling you water has already been through it, long before you saw a puddle.

Start Outside: The Cheapest Fixes That Solve Most Leaks
Most basement leaks are exterior drainage problems wearing a disguise. Rainwater pooling against the foundation has nowhere to go but down and in. Correcting how water moves around your house solves a surprising share of wet basements for very little money.
Walk the perimeter after a heavy rain and fix these in order:
- Regrade the soil. The International Residential Code calls for the ground to slope away from the foundation at least six inches over the first ten feet. Add soil where it has settled into a low spot against the wall.
- Clean and repair gutters. Clogged gutters dump concentrated water right at the foundation. Clear them every season.
- Extend downspouts. Carry roof runoff four to six feet away from the house. A downspout extension costs about fifteen dollars and prevents thousands in damage.
- Fix window wells. Add gravel for drainage and clear plastic covers to keep rain out.
Here is the uncomfortable math of a wet basement: the most catastrophic problem in the house often has the cheapest cure. A flooded floor that looks like a $20,000 emergency frequently traces back to a disconnected downspout you can fix yourself before lunch.
Interior Waterproofing Methods (What You Can Do Yourself)
Interior methods manage water that is already getting in, rather than stopping it at the wall. They range from a weekend paint job to a serious drainage installation, and knowing the difference keeps you from overpaying or underfixing.
Your DIY-friendly options, from lightest to heaviest:
- Waterproof masonry sealant. Products like cementitious or acrylic masonry coatings bond to bare, clean, dry block and resist mild moisture. They will not stick over old paint, and they will not hold back serious water pressure.
- Hydraulic cement. This expands as it cures, making it ideal for sealing active cracks and the gaps around pipe penetrations.
- Vapor barriers. Sheet membranes block humidity from a finished wall but do nothing against water being forced through from outside.
- Interior drain tile and a sump pump. The genuine interior fix: a channel cut into the floor perimeter collects water and routes it to a pump that ejects it outside.
Sealant gets reached for first because it is cheap, visible, and satisfying to apply. The trouble is hydrostatic pressure. Poured concrete and block are porous, and when the water table rises after rain, that pressure pushes water straight through the pores. A coating on the inside face has no way to win that fight for long, which is exactly the frustration homeowners voice online.
Anyone here actually happy with basement waterproofing?
That thread is worth reading before you commit. The recurring lesson: interior coatings buy time, but if water keeps coming, the fix lives somewhere else.
Exterior Waterproofing: The Permanent Fix (and Why It Costs So Much)
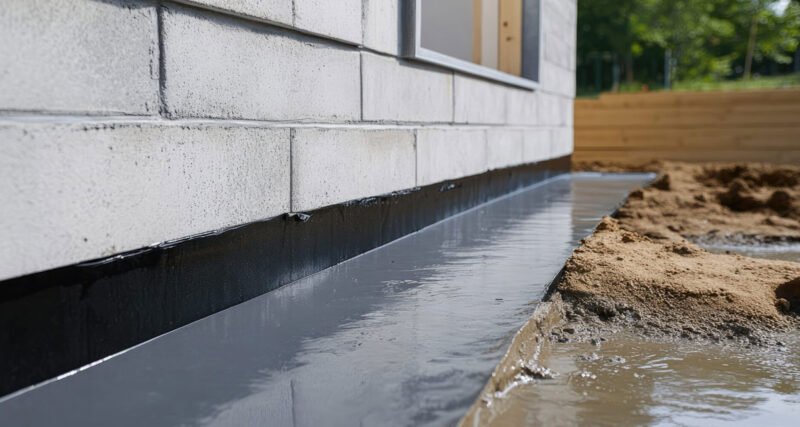
Exterior waterproofing is the only method that stops water before it touches the foundation. A crew excavates down to the footing, cleans the wall, and applies a waterproof membrane or dimple board, then installs a perimeter drain that carries groundwater away to daylight or a sump. Done right, it can last for decades.
The reason it costs so much is the digging. Crews must remove soil from the entire affected wall, often working around decks, landscaping, and utility lines, then backfill and restore the yard. The waterproofing material itself is a small fraction of the bill; the labor and excavation are the expense.
This is also the method that beats hydrostatic pressure honestly. By intercepting groundwater outside the wall and relieving the pressure through a footing drain, it removes the force that pushes water inward in the first place. Interior systems manage that water after it arrives; exterior systems stop it from arriving. Homeowners weighing that gap are the ones asking the hard question.
Is basement waterproofing worth it long-term, or just a temporary fix?
What It Costs: DIY vs Professional by Method
Basement waterproofing costs anywhere from under fifty dollars for a tube of sealant to well past fifteen thousand for full exterior excavation. The right number depends entirely on which problem you are solving, so match the method to the leak rather than to the brochure.
| Method | DIY cost | Professional cost | Best for |
|---|---|---|---|
| Downspout extensions and regrading | $15–$300 | $500–$3,000 | Pooling water, the first thing to try |
| Crack repair (hydraulic cement / injection) | $20–$150 | $400–$1,500 | Isolated cracks and pipe gaps |
| Interior masonry sealant | $50–$600 | $1,500–$4,000 | Minor seepage and dampness |
| Interior drain tile plus sump pump | $1,000–$3,000 | $3,000–$10,000 | Recurring water along the floor edge |
| Exterior excavation and membrane | Rarely DIY | $15,000–$30,000+ | Chronic flooding, structural concern |
According to home-services cost trackers Angi and HomeAdvisor (2024), professional basement waterproofing nationally averages around five thousand dollars, with interior systems clustering near the lower end and exterior excavation at the top. Regional labor rates and how far crews must dig swing those figures widely.
What are common basement waterproofing methods?
Is Basement Waterproofing Worth It, and When to Call a Pro
The honest answer is that it depends on the source and the severity. Fixing exterior drainage is almost always worth it because it is cheap and prevents the problem. Interior-only coatings are often band-aids that disappoint once water pressure builds. Full systems are worth it when flooding is recurring and you have already ruled out the easy causes.
Use a simple threshold to decide between DIY and a professional:
- Do it yourself when the issue is pooling water, occasional dampness, a few hairline cracks, or condensation. Grading, gutters, sealant, and hydraulic cement are well within reach.
- Call a professional when water returns every heavy rain, when cracks are horizontal or widening, when you need interior drain tile and a sump, or when excavation is on the table.
The pattern that quietly works: plenty of homeowners chase a dry basement with sealant and dehumidifiers, get nowhere, then fix the gutters and grading and never think about it again. The cheapest move is usually the one tried last.
Community Verdict (as of 2026): Across r/handyman, r/HomeMaintenance, and r/DIY — communities of working tradespeople and hands-on homeowners — the mood is cautious. Many users report that interior coatings underperform, that drainage corrections deliver the best return, and that expensive whole-house “systems” sold by pressure-heavy contractors are the most common regret. The consistent advice is to diagnose first and fix the outside before paying for the inside.
Frequently Asked Questions
Can I waterproof a basement myself?
Yes, for most minor problems. Regrading soil, extending downspouts, sealing cracks with hydraulic cement, and applying masonry sealant are all manageable DIY tasks. Interior drain tile and exterior excavation are jobs for professionals because of the equipment, scale, and structural risk involved.
What is the cheapest way to waterproof a basement?
Improving exterior drainage is the cheapest and most effective first step. Extending downspouts and regrading soil away from the foundation can cost under a few hundred dollars and resolves a large share of leaks before any interior work is needed.
Does waterproofing a basement increase home value?
A dry, documented basement protects value and reassures buyers, especially in wet climates. It rarely returns its full cost as a line-item upgrade, but a history of water problems can sink a sale, so the value is mostly in preventing a deal-killing inspection finding.
How long does basement waterproofing last?
It varies by method. Interior sealants may last only a few years under pressure, interior drainage systems and sump pumps run ten to twenty years with maintenance, and properly installed exterior membranes can last the life of the foundation.
Is waterproofing basement walls from the inside enough?
Often not on its own. Interior waterproofing manages water that has already entered and works against hydrostatic pressure that keeps pushing more in. For persistent leaks, pair interior drainage with exterior drainage corrections, or address the wall from outside.
The Bottom Line
Waterproofing a basement is less about one heroic product and more about working in the right order. Diagnose the source, fix the cheap exterior drainage first, then escalate to interior repairs or a professional system only if water keeps coming. Spend on the outside before the inside, and you will spend far less overall.
RankMath SEO Meta (Copy & Paste)
SEO Title: How to Waterproof a Basement: Step-by-Step Guide
Meta Description: Learn how to waterproof a basement by budget: diagnose the leak, fix exterior drainage first, then interior sealants, drain tile, or excavation. Costs included.
Focus Keyword: how to waterproof a basement
URL Slug: how-to-waterproof-a-basement