

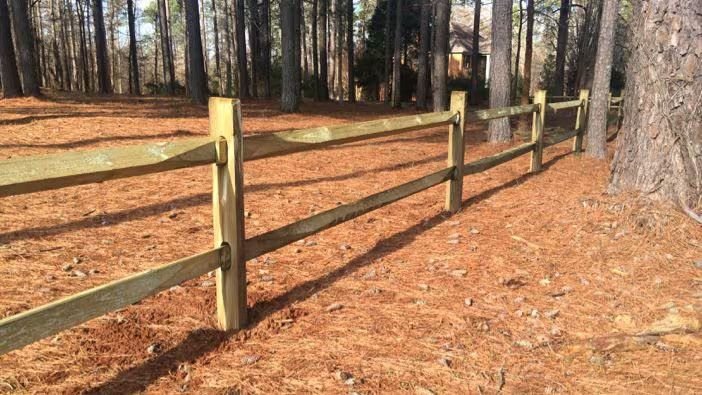
A split rail fence is the simplest fence to install. The posts have pre-drilled mortise holes. The rails have tapered ends that slide into the holes. There are no screws, nails, brackets, or hardware of any kind. The fence is held together by gravity and geometry. The rails rest in the post holes under their own weight. The posts are set in the ground, and the rails float between them. A 100-foot section of two-rail split rail fence can be installed in a weekend by two people with no prior fence experience.
Split rail is a boundary fence, not a privacy fence or a security fence. The rails are spaced 8 to 12 inches apart, leaving large gaps that a child or a dog can walk through. The fence defines a property line, frames a landscape, or contains large livestock that respect a visual barrier. It is the traditional fence of rural properties, farmsteads, and large lots where the fence is a statement of where the property begins, not a barrier that stops anything except a car. Here is how to lay it out, set the posts, and drop the rails into place.
Split Rail Fence Types: Two-Rail vs. Three-Rail
A two-rail fence is 3 to 4 feet tall with rails at approximately 18 inches and 36 inches above the ground. It is the standard for residential properties and decorative boundaries. A three-rail fence is 4 to 5 feet tall with rails at approximately 14, 30, and 46 inches. It is used for horse pastures and properties where a slightly taller visual barrier is desired. The posts for a three-rail fence are taller and have three mortise holes instead of two, but the installation process is the same.
The posts are typically 6 to 8 feet long for two-rail fences, with 2 to 3 feet in the ground and 3 to 4 feet above ground. The rails are 8 or 10 feet long, measured from the center of one post to the center of the next. The 8-foot spacing is standard for residential fences. The 10-foot spacing reduces the number of posts and the cost but increases the sag between posts and is more common on large rural properties where the fence is a distant visual element rather than a close-up landscape feature.
Split rail is almost always cedar or black locust. Cedar is lighter, easier to handle, and naturally rot-resistant. Black locust is heavier, harder, and more rot-resistant than cedar, lasting 30 to 50 years in ground contact compared to 15 to 25 years for cedar. Black locust posts do not need concrete or gravel at the base because the wood itself is so rot-resistant. Cedar posts benefit from gravel at the base of the hole for drainage.
Step One: Lay Out the Fence Line
Call 811 before digging. Mark the fence line with stakes and string. Determine the post spacing. For 8-foot rails, the posts are spaced 8 feet on center. For 10-foot rails, the posts are spaced 10 feet on center. The spacing must be consistent because the rails are pre-cut to length. A post that is 2 inches out of position means the rail is too short to reach the post, and a rail that is too short falls out. The post spacing is the most critical measurement in split rail fence installation.
Mark the post locations along the string. Start at the corners and ends. The corner posts and end posts carry the rails from two directions. A corner post has two sets of mortise holes, one set on each adjacent face, oriented 90 degrees apart. A line post has one set of mortise holes passing straight through. An end post has mortise holes on one face only, or the rail ends can be cut flush and the post used as a terminal. Buy the correct post type for each location. A corner post cannot be substituted for a line post and vice versa.
For projects near pre-1978 homes, the EPA recommends containing excavated soil due to possible lead paint residue from older exterior paint that may have accumulated in soil near the foundation.
Step Two: Set the Posts
Dig the post holes 8 to 10 inches in diameter and 24 to 36 inches deep, below the frost line. The hole depth is the same as for any fence post: below the frost line so the post does not heave. For a two-rail fence with 3 feet of post above ground, a 6-foot post set 30 inches deep leaves 42 inches above ground, which is trimmed to the final height after the concrete cures if the posts are not pre-cut to exact length.
Set the post in the hole. For cedar posts, pour 6 inches of gravel into the bottom of the hole for drainage before setting the post. The gravel prevents water from pooling at the base and extends the life of the post. For black locust posts, gravel is optional. Fill the hole around the post with concrete or with tamped gravel. Concrete is stronger and prevents the post from leaning under the weight of the rails and the lateral force of wind. Tamped gravel allows water to drain away from the post and is easier to dig out when the post eventually needs replacement. For cedar posts in wet climates, tamped gravel is recommended because concrete traps moisture against the post and accelerates rot.
Brace the post plumb in both directions while the concrete cures. The mortise holes must be aligned with the fence line so the rails slide straight into the holes. A post that is twisted even a few degrees out of alignment will not accept the rail without binding. Check the mortise hole alignment with a scrap piece of rail or a straightedge before the concrete sets. Adjust the post by twisting it in the wet concrete until the holes align with the fence line.
Let the concrete cure for at least 24 hours before inserting the rails. The posts must be rigid in the ground. Inserting rails into posts that are still moving in wet concrete knocks the posts out of alignment and out of plumb.
Step Three: Insert the Rails
Slide the tapered end of each rail through the mortise hole in one post and into the corresponding hole in the next post. The rail should slide freely. If it binds, the post spacing is slightly off, the post is twisted, or the mortise hole contains debris or a rough edge. Clear the hole with a rasp or a chisel if the rail binds. Do not force the rail. A rail driven in with a hammer will split the post at the mortise.
The rail ends should extend 2 to 6 inches beyond each post. The overhang is part of the rustic aesthetic. The rails are not cut flush. If the rails are too long and the overhang is more than 8 to 10 inches, the post spacing may be too close. If the rails are too short and do not reach the next post, the post spacing is too wide. Split rail is forgiving of minor variations in post spacing because the rails are longer than the nominal post spacing. An 8-foot rail between posts spaced 8 feet on center has approximately 2 to 3 inches of total play at both ends. The play allows the fence to be installed on gently sloping ground without cutting the rails.
Insert the rails from the same side of the fence for consistency, or alternate the direction so the rail ends alternate on each side, which is the traditional method. There is no structural reason to choose one over the other. It is an aesthetic choice. Alternating rail ends looks balanced. All rail ends on one side looks deliberate from one direction and unseen from the other.
On a corner, the rails from both fence runs slide into the mortise holes on the adjacent faces of the corner post. The rails should not touch each other inside the post. If the rails are too long and bottom out against the intersecting rail, trim the rail end by 1 to 2 inches with a handsaw or a chainsaw. A rail that bottoms out prevents the intersecting rail from seating fully in its mortise.
Installing a Split Rail Fence on a Slope
Split rail fences step down slopes. Each section of fence between two posts is level. The posts are set at different heights to follow the slope. The rails are installed horizontally. On a gentle slope, the fence steps down every post or every other post, and the gap under the bottom rail varies with the slope. The variation is acceptable because split rail is a rustic fence and the gap under the bottom rail is not uniform in any case.
On a steep slope, each section steps down one or two rail spacings, and the bottom rail of one section may align with the top rail of the adjacent section. The stepped appearance is characteristic of split rail fences on hillsides and is part of the aesthetic.
Split rail does not rack. Unlike chain link or some vinyl fences, the rails cannot follow the slope at an angle because the mortise holes are cut perpendicular to the post. The rail must enter the hole straight. A post set at an angle to follow the slope will not accept the rail. The fence must step. If the slope requires the fence to follow the ground continuously rather than stepping, choose a different fence type.
Split Rail vs. Other Fence Types: Cost Comparison
| Fence Type | Material Cost (per 100 ft) | Installation Speed | Lifespan |
| Split rail (cedar, 2-rail) | $400–$700 | Fastest (1–2 days) | 15–25 years |
| Split rail (locust, 2-rail) | $600–$1,000 | Fastest (1–2 days) | 30–50 years |
| Cedar privacy | $800–$1,400 | Medium (2–3 days) | 15–25 years |
| Chain link (galvanized, 4 ft) | $400–$800 | Medium (2–3 days) | 15–20 years |
| Vinyl privacy | $2,500–$4,500 | Medium (2–3 days) | 25–30 years |
Split rail is the least expensive wood fence and the fastest to install. The trade-off is that it provides no privacy, no security, and no pet containment. It is a boundary marker and a landscape feature. For a fence that does those things, it is the best value for the money.
Frequently Asked Questions
Can I attach welded wire to a split rail fence to contain pets?
Yes. Welded wire fencing attached to the back side of a split rail fence with U-shaped fence staples provides pet containment while preserving the split rail appearance from the front. The wire should be attached to the back side, which faces the property being contained, so the split rail face is visible from the street or the neighbor’s view. The wire adds $50 to $100 per 100 feet in material cost and approximately half a day of labor. This is the standard solution for homeowners who want the look of a split rail fence but need to contain a dog.
Do the mortise holes face the same direction on every post?
For line posts, yes. The mortise holes pass straight through the post from one side to the other. The fence line runs through the holes. For corner posts, the mortise holes are on adjacent faces, oriented 90 degrees apart. For end posts, the mortise holes are on one face only so the rail ends are not visible from the end of the fence. The posts are labeled at the lumber yard or in the fencing kit. Line posts, corner posts, and end posts are not interchangeable.
Does a split rail fence need any maintenance?
The cedar or locust wood does not need to be sealed, stained, or painted. The wood weathers naturally to a silver-gray color over the first 1 to 2 years. The weathering is cosmetic and does not affect the structural integrity. Some homeowners apply a clear wood sealer to preserve the fresh-wood color, but this is an aesthetic choice, not a maintenance requirement. The only maintenance is occasionally tapping a rail back into position if it has shifted, which happens after freeze-thaw cycles or if the fence is bumped by a vehicle or large animal.