Building a retaining wall using railroad ties is a project where the material dictates the tools, and the tools dictate how long the project takes. A tie weighs 150 to 200 pounds. Moving one requires leverage, a helper, or a machine. Drilling a hole through seven inches of dense, creosote-saturated wood requires a powerful drill, a long bit, and patience. Cutting a tie to length requires a chainsaw with a sharp chain and a willingness to stand in a cloud of oily sawdust. The wall itself is simple: ties stacked horizontally, pinned together, anchored into the hillside with deadman ties running perpendicular to the face. The complexity is not in the design. It is in moving, cutting, drilling, and fastening wood that was built to hold up a train.
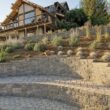
Railroad ties are not a precision material. They are rough-cut, varying slightly in thickness and straightness, with splits, checks, and the occasional embedded gravel from decades of ballast contact. A tie wall does not look like a concrete block wall. It looks like a structure built from reclaimed industrial timber, which is exactly what it is. The joints are not perfectly tight. The top surface is not perfectly flat. The wall has the character of the material it is made from. If you want a wall with uniform joints and a smooth cap, build it from segmental block. If you want a wall that looks like it belongs on a working farm, use railroad ties.
Step 1: Choose Your Fastening Method and Assemble Tools
The fasteners are what hold a tie wall together. There are four methods, and the one you choose determines the tools you need and the speed of the build. Steel rebar pins, half-inch diameter and 24 to 30 inches long, are the most common. Drill a five-eighths-inch hole through the tie, drive the rebar through into the tie below, and the pin locks the two courses together. The hole must be slightly larger than the rebar. If the hole is exactly the same diameter, the rebar will seize. If the hole is too large, the rebar will wobble and the connection will be loose.
Timber screws, also called landscape timber screws or timber ties, are a faster alternative to rebar. They are large-diameter screws, typically three-eighths to half an inch thick and 10 to 12 inches long, with a hex head driven by an impact wrench. They eliminate the drilling step. The screw drives directly through the tie into the tie below. The holding power is comparable to rebar for walls under three feet. For taller walls, rebar provides more shear strength. The trade-off is speed versus ultimate strength. Timber screws install in seconds per connection. Rebar takes minutes per pin but creates a stronger wall.
Through-bolts with washers and nuts are used at corners and deadman connections where the load is highest. Drill all the way through both ties, insert a half-inch galvanized bolt, add a washer on both ends, and tighten the nut. The bolt clamps the ties together. The connection is stronger than rebar in tension but requires access to both sides of the wall, which is only possible at corners and where the back of the wall is exposed before backfilling. Spike nails, the 12-inch galvanized spikes driven with a sledgehammer, are the traditional method. No drilling required. The spike is driven through the tie into the tie below. It is the fastest method, the oldest method, and the weakest method. Spikes rely on friction alone. Rebar, screws, and bolts provide a mechanical connection that resists uplift. Use spikes for low garden walls under two feet. Use rebar or screws for anything taller.
Tools for the project: a heavy-duty half-inch drill with a side handle for rebar holes, a five-eighths-by-12-inch auger bit, a chainsaw with a sharp chain and extra bar oil, a sledgehammer, a digging bar, a six-foot level, a come-along for pulling ties into position, work gloves that you do not care about, and long sleeves. The creosote will get on everything. It does not wash out of fabric. Designate a set of clothes as your tie-wall clothes and accept that they will never be worn for anything else.
Step 2: Set the Base Course and Build Corners
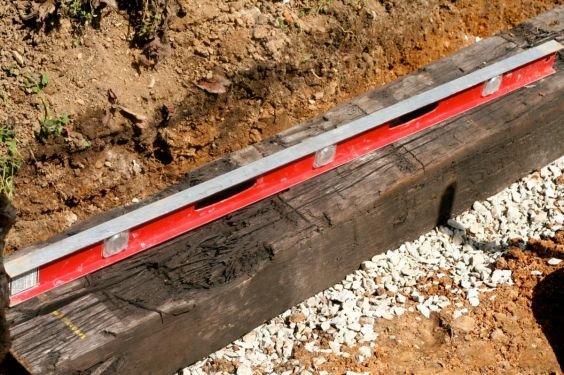
The first course of ties sits on six inches of compacted angular gravel in a trench deep enough to bury the ties four to six inches below grade. The trench must extend 24 to 28 inches behind the face of the wall for the gravel backfill column. Lay the first course of ties end to end. Check level in both directions. The ties are not perfectly dimensioned. One tie may be seven and a half inches thick and the next six and three-quarters. Shim the thinner ties with gravel under the low spots, or use a chainsaw to shave the high spots on thicker ties. The top of the first course must be level even if the ties themselves are not uniform.
Corners are the most structurally demanding part of a tie wall. The ties at a corner must overlap in a way that ties the two walls together. The standard corner detail alternates the direction of the ties at each course. On the first course, one tie runs the full length of one wall and butts into the side of the tie running the full length of the other wall. On the second course, the pattern reverses. The overlapping creates a mechanical lock at the corner. Pin the corner ties together with through-bolts if possible, or with rebar pins drilled at an angle through the overlapping section. A corner that is not properly tied will separate under the pressure of the backfill, and the gap between the two walls will grow until the corner is no longer a corner.
Step 3: Stack Courses With Deadman Ties and Backfill
Each course sits directly on the course below, set back approximately half an inch to create a slight batter. Stagger the joints between courses by at least two feet so that no vertical seam runs continuously through the wall. Pin each tie to the tie below with the chosen fastener, two per tie, placed roughly 12 inches from each end. The pins transfer the lateral load from the soil behind the wall through the ties to the ground. A pin that misses the tie below provides no connection. Drill the holes straight and measure from a consistent reference.
Install deadman ties every six to eight feet and every other course vertically. A deadman is a tie or a section of tie at least four feet long that runs perpendicular to the wall face, buried in the backfill. The deadman anchors the wall face to the earth. Without deadmen, the wall is a freestanding stack of ties with nothing preventing it from tilting outward under soil pressure. The deadman must be level or tilted slightly downward toward the back so that the weight of the soil above it pushes it down into the earth rather than lifting it. Pin the deadman to the course below and the course above at the wall face. The backfill over the deadman must be compacted gravel, not loose soil. A deadman in uncompacted backfill does nothing. The soil must be dense enough to grip the tie and resist it being pulled forward.
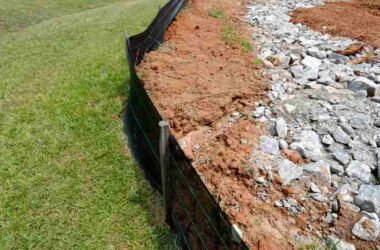
Backfill behind each course with angular gravel as you build. Compact each lift. The gravel column must extend at least 12 inches behind the ties and run the full height of the wall. Install a perforated drain pipe behind the first course, wrapped in landscape fabric, and daylight it out the end of the wall. The drainage principles are the same as for any retaining wall. For a tie wall, drainage is especially important because the wood will rot if it sits in constant moisture, even creosote-treated wood. The gravel backfill and drain pipe extend the wall’s life by keeping the back face of the ties as dry as possible.
Step 4: Build Tiered Walls and Handle Curves
A single railroad tie wall should not exceed four feet in height without engineering. For slopes that require more than four feet of retained height, build tiered walls. Each wall is three to four feet tall. The upper wall is set back from the lower wall by at least twice the height of the lower wall. For a four-foot lower wall, the upper wall sits eight feet back. The terrace between the walls is flat, planted, and stabilized. The upper wall’s deadman ties extend back into the terrace fill. The lower wall’s deadman ties extend back under the terrace. The two walls work independently. The load of the upper wall does not transfer into the lower wall.
Curved walls are built by cutting short sections of tie and angling them to follow the curve. A tie wall cannot bend smoothly like a segmental block wall. The curve is a series of short straight sections, each tie angled slightly from the one before it. Cut ties to lengths of two, three, or four feet for tight curves. The shorter the tie section, the tighter the possible curve. The joints between the short sections must be staggered from course to course just like full-length ties. A curved tie wall has a faceted appearance. It looks like a series of straight walls joined at angles. That is what it is. The facets are more visible the tighter the curve. On a gentle curve with four-foot tie sections, the facets are barely noticeable. On a tight curve with two-foot sections, the wall looks deliberately faceted and that is part of its character.
Frequently Asked Questions
Which is better for fastening railroad ties: rebar, timber screws, or spikes?
Rebar provides the strongest connection and is the standard for walls over three feet. It requires drilling a five-eighths-inch hole through the tie and driving a half-inch rebar pin through into the tie below. Timber screws driven with an impact wrench are faster, eliminate the drilling step, and provide adequate strength for walls under three feet. Spikes driven with a sledgehammer are the traditional method and the fastest to install, but they rely on friction alone and can work loose over time as the wood expands and contracts. Use spikes for decorative walls under two feet. Use timber screws for walls two to three feet. Use rebar for walls three to four feet and for all deadman connections regardless of wall height.
Can I use landscape timbers instead of railroad ties?
Landscape timbers are pressure-treated three-by-five or four-by-six beams sold at home centers. They are lighter, roughly 20 to 30 pounds each, and easier to handle than 150-pound railroad ties. They can be used for retaining walls up to two feet tall using the same construction method: stacked, pinned, with gravel backfill and drainage. The trade-off is lifespan. Landscape timbers are treated for ground contact but are not as dense or as heavily treated as railroad ties. A landscape timber wall lasts 10 to 15 years. A railroad tie wall lasts 25 to 40. For a low garden wall or a temporary retaining structure, landscape timbers are a lighter, cheaper, and easier alternative. For a permanent wall, use railroad ties.
How do I cut railroad ties to length?
A chainsaw with a sharp chain is the only practical tool for cutting railroad ties. A circular saw cannot cut through a seven-by-nine-inch tie in a single pass. A reciprocating saw with a long blade will eventually get through but takes several minutes per cut and burns through blades. The chainsaw cuts through in seconds. The sawdust from creosote-treated ties is oily, sticks to everything, and contains the same chemicals as the creosote in the tie. Wear eye protection, a dust mask rated for chemical particulates, gloves, and long sleeves. Cut outdoors with the wind at your back. Clean the chainsaw thoroughly after the project. Creosote residue on the bar and chain will gum up and harden if left to sit.
The Bottom Line
A retaining wall built with railroad ties is a stack of heavy timbers held together by steel pins, anchored into the hillside by deadman ties, and protected from water by a gravel backfill column and a drain pipe. The tool that matters most is the drill. The hole that is straight and slightly oversized for the rebar is the difference between a connection that locks and a pin that seizes halfway through. The deadman that is tilted slightly down into the backfill is the difference between an anchor that holds and one that pulls out. The gravel that is compacted behind each course is the difference between a wall that lasts 30 years and one that rots from the back in 10. The ties do the heavy lifting. The fasteners, the deadmen, and the drainage do the engineering. Get those three right and the wall will still be there when the chainsaw you used to cut the ties has been replaced twice.