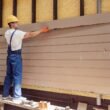
Installing Hardie board siding is a project where the cutting method determines how long the project takes, how much dust you breathe, and how clean the cuts look. The previous guide covered the basics: blind nailing, butt joint flashing, and expansion gaps. This guide covers the decisions that come after you understand the basics: which cutting tool to use, how to caulk the joints so they stay sealed for a decade, what paint to use and when to apply it, and how to handle corners and trim so the finished wall looks like it was installed by someone who has done it before.
Hardie board is fiber cement. It is cement, sand, and cellulose fiber formed into planks that look like wood but behave like masonry. It does not rot, does not burn, does not expand significantly, and weighs roughly 20 to 30 pounds per 12-foot plank. The weight is the first adjustment for anyone coming from vinyl. The dust is the second. The cutting tools are the third, and the right tool is the difference between a clean installation and one where every cut edge is ragged and every joint is a mess of caulk trying to hide the saw marks.
Cutting Tools: Saws, Shears, and the Dust Problem
A circular saw with a polycrystalline diamond blade, often sold as a Hardie blade, is the most common cutting tool. The blade has four to six teeth embedded with diamond grit. It cuts through fiber cement cleanly and quickly. It also produces a massive cloud of silica dust. Cut outdoors with the wind at your back. Cut on the ground, not on sawhorses, so the dust settles instead of blowing across the yard. Wear an N95 respirator at minimum. A P100 half-face respirator is better. Silica dust from fiber cement is a known respiratory hazard. One siding project is low risk, but the risk accumulates with every project. Wear the mask.
Electric fiber cement shears are the dust-free alternative. The shears cut the plank with two blades that move past each other like scissors. They produce no dust, only small chips that fall straight down. The shears cost $200 to $400 to buy, or $40 to $60 per day to rent. They are worth the rental cost for a whole-house project. The cut edge from shears is slightly rougher than a saw cut. For edges that will be hidden by trim, the roughness does not matter. For exposed edges at butt joints, a quick pass with a sanding block smooths the edge.
A guillotine-style fiber cement cutter is a manual tool that shears the plank with a long lever. It is silent, dust-free, and produces the cleanest cut of any method. It is limited to straight crosscuts. It cannot cut angles or rip planks lengthwise. For cutting planks to length on a wall where every piece is the same width, the guillotine is the cleanest and fastest tool. For gable ends, notches around windows, and rip cuts, you need the circular saw or the electric shears. Most pros use a combination: a guillotine for the repetitive crosscuts and a saw or shears for everything else.
Caulking and Painting: The Finish That Determines Durability
Hardie board must be painted. Factory-primed planks are primed only. The primer protects the plank during storage and installation. It is not a finish coat. The finish paint must be applied after installation. The paint is what protects the fiber cement from moisture absorption. A plank left unpainted will absorb water, swell, and eventually delaminate. Paint the cut ends of every plank before installation. A cut end is raw fiber cement with no primer. Brush paint onto every cut edge before the plank goes on the wall. The cut end hidden inside the J-channel or behind the corner board will absorb moisture from humidity and rain splash. Painting the cut ends takes an extra 30 seconds per plank and prevents swelling that is impossible to fix after the siding is up.
Use 100 percent acrylic latex exterior paint, flat or satin finish. Apply two coats over the primed surface. The first coat can be sprayed and back-rolled. The second coat should be applied within the recoat window specified by the paint manufacturer, typically within two weeks. Do not paint Hardie board when it is wet, when the temperature is below 35 degrees, or when the plank surface is hot from direct sun. Paint applied to a hot surface dries too fast and does not bond properly.
Caulk every butt joint, every gap between siding and trim, and every penetration with a high-quality paintable exterior caulk. James Hardie specifies a caulk that meets ASTM C920, Class 25. The caulk must remain flexible. The siding does not expand much, but it does expand slightly, and the caulk must stretch with it. A cheap painter’s caulk will crack within a year. Use a caulk designed for exterior use on fiber cement. Apply it after the siding is up and before painting. Tool the caulk smooth with a wet finger. Paint over the caulk within the paint manufacturer’s recommended timeframe.
Corner Boards and Trim: The Finish That Frames the Wall
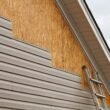
Hardie board does not use vinyl corner posts. Outside corners are finished with corner boards, vertical trim pieces that the siding butts into. The corner boards can be fiber cement trim boards, one-by-four or five-four-by-four, or they can be wood trim boards, cedar or pressure-treated, painted to match. Fiber cement trim is more durable and will not rot. Wood trim is easier to work with and can be replaced individually if a piece fails.
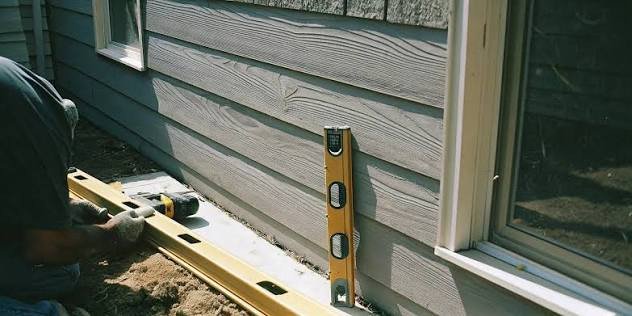
Install corner boards first, before any siding. The corner boards must be plumb and securely fastened to the framing. The siding planks butt into the corner boards with a one-eighth-inch gap. The gap is caulked and painted. The corner board creates a clean vertical line that frames the wall and hides the cut ends of the siding. Inside corners are finished the same way, with a trim board in the corner that the siding from both walls butts into. Alternatively, a metal or vinyl inside corner flashing can be used, with the siding from one wall running behind the siding from the other wall.
Window and door trim on a Hardie board house is typically fiber cement trim boards or PVC trim boards. The trim is installed over the house wrap and the window flange, then the siding butts into the trim with the standard one-eighth-inch gap. The trim must be flashed at the top with a metal drip cap that directs water over the face of the trim. The drip cap goes on before the trim, and the top piece of trim covers the vertical leg of the drip cap.
Frequently Asked Questions
Are fiber cement shears worth the cost over a circular saw?
For a whole-house project, yes. The shears eliminate the silica dust, which means no respirator all day, no dust cloud drifting onto the neighbor’s house, and no dust settling on every horizontal surface within 50 feet. The rental cost of $40 to $60 per day is a small fraction of the total project cost. For a small project, a shed or a single wall, the circular saw with a diamond blade and a good respirator is the practical choice.
Why does caulk fail on Hardie board siding?
Caulk fails for two reasons: the wrong caulk was used, or the joint was too narrow. Cheap acrylic caulk dries hard and cracks when the siding moves. Use a high-quality elastomeric or polyurethane caulk rated for exterior use on fiber cement. The joint must be at least one-eighth of an inch wide to give the caulk enough thickness to stretch. A hairline joint filled with a thin bead of caulk has no stretch capacity. The caulk cracks, water enters the joint, and the freeze-thaw cycle opens the crack wider each year.
Why does paint peel off Hardie board siding?
Paint peels when it was applied over a dirty or wet surface, when the factory primer was not cleaned before painting, or when the wrong type of paint was used. Wash the siding before painting if it has been up for more than a few weeks. Construction dust and pollen settle on the surface and prevent paint adhesion. Use 100 percent acrylic latex exterior paint. Oil-based paint does not bond well to the factory primer. Apply two coats. A single coat leaves thin spots where moisture can penetrate.
The Bottom Line
Hardie board siding is cut with a diamond blade, shears, or a guillotine. The dust requires a respirator. The cut ends must be painted before installation. The joints are caulked with elastomeric caulk and painted with acrylic latex. The corners are trimmed with fiber cement or wood corner boards. The trim goes on first, the siding butts into it with a gap, and the gap is caulked. Every one of these steps is necessary. Skip the cut-end painting and the plank swells. Use the wrong caulk and the joints crack. Skip the respirator and the silica dust accumulates in your lungs. Hardie board is a premium material that demands a premium installation process. Do it correctly and the siding will outlast the roof.