

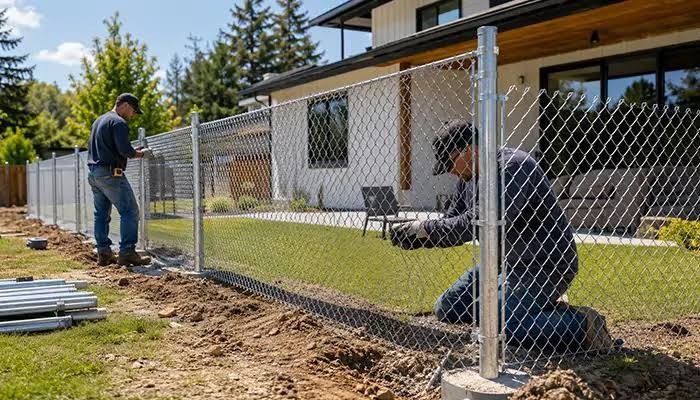
A chain link fence is the most cost-effective perimeter fence available. A 100-foot section of 4-foot-tall galvanized chain link costs $600 to $1,200 in materials if you do the work yourself, or $1,500 to $2,500 installed by a fencing contractor. The installation is straightforward: dig holes, set posts in concrete, attach the top rail and the tension wire, and unroll and stretch the chain link fabric. No complex joinery, no cutting angles, no finishing. The work is physical but not technical.
The hardest part is digging the post holes. A two-person auger or a post hole digger makes the digging manageable. A shovel alone makes the job take three times as long and the holes three times as messy. The second hardest part is stretching the fabric tight enough that it does not sag but not so tight that it pulls the terminal posts out of plumb. Here is the sequence from marking the layout to hanging the gate.
Step One: Plan the Layout and Call Before You Dig
Call 811 before you dig any post hole. The national Call Before You Dig number connects you to your state’s utility locating service. Utility companies send a technician to mark the location of underground gas, electric, water, and communication lines on your property. The service is free. The locate is valid for 30 days. Digging without a locate is illegal in most states and dangerous everywhere. A post hole digger through a buried electric line can kill you. A post hole through a gas line can kill your neighborhood.
The EPA recommends lead-safe work practices for any outdoor project that disturbs soil near pre-1978 structures, as lead paint residue may have accumulated in the surrounding soil over decades. For fence installations near older homes, containing excavated soil and keeping children and pets away from the work area until the soil is covered by grass or mulch is a prudent precaution.
Mark the fence line with stakes and string. Drive a stake at each corner and at each end of the fence run. Pull the string tight between the stakes at the proposed fence height minus the height of the top rail. For a 4-foot fence, the string is typically set at 36 to 38 inches above the ground. The string gives you a visual reference for keeping the posts plumb and at the correct height. Mark the location of each line post along the string. Line posts are spaced 8 to 10 feet apart. Ten-foot spacing is standard for residential chain link and requires fewer posts and less digging. Eight-foot spacing is standard for commercial installations and produces a tauter fence.
Step Two: Set the Terminal Posts First
Terminal posts are the end posts, corner posts, and gate posts. They carry the tension of the stretched fabric and the weight of the gate. Line posts between the terminals simply hold the fabric up and keep it straight. Set the terminal posts before the line posts. The terminal posts determine the fence line. The line posts fill in between them.
Dig the terminal post holes 8 to 10 inches in diameter and 30 to 36 inches deep, or below the frost line in your area, whichever is deeper. The frost line depth varies by region: 12 inches in Florida, 36 inches in Chicago, 48 inches in Minneapolis. The hole must extend below the frost line so the post does not heave out of the ground during freeze-thaw cycles. Set the post in the hole. Mix concrete according to the bag instructions and pour it into the hole around the post. Fill the hole to within 4 inches of the top. Slope the concrete away from the post at the top to shed water. Brace the post plumb in both directions with temporary 2-by-4 stakes driven into the ground and screwed to the post. Let the concrete cure for 24 to 48 hours before attaching the fabric or the gate.
Terminal posts for a 4-foot fence are 2-1/2 inches in diameter for end and corner posts and 3 inches in diameter for gate posts. The gate posts are larger because a gate hanging from an undersized post sags immediately and drags on the ground. A gate post set in less than 30 inches of concrete will lean within the first year from the weight of the gate pulling on it every time it opens and closes.
Step Three: Set the Line Posts
After the terminal posts are set and the concrete has cured enough to hold them steady, typically 24 hours, run a string from the top of one terminal post to the next. The string is your height and alignment guide for the line posts. Set the line posts at 8 to 10-foot intervals along the string. Dig each hole 6 to 8 inches in diameter and 24 to 30 inches deep. Line posts carry no tension and less weight than terminal posts, so the holes are smaller and shallower, but they must still extend below the frost line.
Set each post in the hole and pour concrete around it. Tamp the concrete with a stick or a piece of rebar to remove air pockets. Check the post against the string. The post must be plumb, centered on the string, and at the correct height so the top of the post aligns with the top rail. Adjust the post while the concrete is wet. Once the concrete sets, the post is fixed. Allow the concrete to cure for 24 hours before attaching the top rail.
Step Four: Install the Top Rail and Tension Wire
The top rail runs through the tops of the line posts and connects to the terminal posts with rail end caps. Slide the rail sections through the line post tops as you go. The rail sections are swaged at one end, meaning one end is necked down to fit inside the next section. Slide the swaged end into the open end of the adjacent rail section and press it together. The friction fit holds the sections together. No fasteners are needed at the joints. Cut the rail to length at the terminal posts with a hacksaw or a reciprocating saw. Attach the rail to the terminal posts with rail end caps, which are cups that fit over the end of the rail and bolt to the post.
The tension wire runs along the bottom of the fence, threaded through the line posts near ground level. The tension wire prevents the bottom of the fabric from being pushed inward by dogs, children, or wildlife. Thread the wire through the holes in the line posts. Attach one end of the wire to a terminal post with a tension band. Pull the wire hand-tight along the entire fence run. Attach the other end to the opposite terminal post with a tension band. A fence stretcher or a come-along can be used to pull the wire tighter than hand tension, which is recommended for fences taller than 4 feet or for fences that will contain large dogs.
Step Five: Unroll and Hang the Chain Link Fabric
The chain link fabric comes in rolls of 25, 50, or 100 feet. The roll is heavy. A 100-foot roll of 4-foot fabric weighs 80 to 100 pounds. Stand the roll on end and walk it along the outside of the fence line to unroll it. Do not drag the roll on the ground, which catches on every rock and root and makes the job harder than it needs to be.
Slide a tension bar through the first row of diamonds at one end of the fabric. The tension bar is a solid metal rod that distributes the stretching force across the full height of the fabric. Bolt the tension bar to the terminal post using tension bands. One tension band every 12 to 18 inches of post height. For a 4-foot post, three tension bands are standard.
Stretch the fabric along the fence line toward the opposite terminal post. If the fabric is not long enough to reach the next terminal, splice two rolls together with a fabric splice bar, which is a tension bar woven through the diamonds of both fabric ends and secured with tension bands. Walk the fabric along the fence, pressing it against the line posts. Loosely attach the fabric to the top rail and the line posts with tie wires spaced every 12 to 18 inches. Do not tighten the ties yet.
Step Six: Stretch the Fabric
Stretching the fabric is the step that determines whether the fence looks professionally installed or looks like a DIY job. The fabric must be taut enough that it does not sag between posts but not so tight that it bends the terminal posts inward. A chain link fence stretcher, also called a come-along or a fence puller, is the tool that makes this possible. It costs $40 to $80 and is essential. The alternative, pulling the fabric by hand and tightening the tension bands, produces a fence that sags within weeks.
Attach the stretcher to the tension bar at the loose end of the fabric. Hook the other end of the stretcher to the terminal post. Ratchet the stretcher until the fabric is taut. A properly stretched chain link fabric deflects 1 to 2 inches when you press on it with your hand at the midpoint between two posts. If it does not deflect at all, it is too tight and is pulling the terminal posts out of plumb. If it deflects more than 3 inches, it is too loose and will sag. Adjust the stretcher until the deflection is right.
While the fabric is under tension, bolt the loose-end tension bar to the terminal post with tension bands. Release the stretcher. Walk the fence line and secure the fabric to the top rail with tie wires every 12 to 18 inches. Secure the fabric to each line post with tie wires at the top, middle, and bottom. Twist each tie wire tightly with pliers and bend the twisted end inward toward the post so it does not snag clothing or skin. Secure the fabric to the tension wire at the bottom with hog rings or tie wires every 12 to 18 inches.
Step Seven: Hang the Gate
The gate hangs from the gate post using hinge clamps that wrap around the post and bolt to the gate frame. The hinges are designed to allow the gate to swing a full 180 degrees. Position the gate between the gate posts with approximately 3/4 inch of clearance on the latch side and 1/2 inch of clearance at the bottom for ground clearance. The clearance allows the gate to swing without dragging and prevents the latch from binding when the gate post shifts slightly with the seasons.
Attach the top hinge first, then the bottom hinge. Adjust the gate height by sliding the hinge clamps up or down on the post before tightening them. Install the latch on the opposite gate post. The latch fork should engage the gate frame with enough overlap that the gate cannot be pushed open by wind or by a dog leaning against it. Test the gate swing. The gate should move freely without binding. If the gate binds at the latch, the gate posts are not parallel. Adjust the hinge clamp position or shim the latch to compensate.
Frequently Asked Questions
Do all chain link fence posts need concrete?
Terminal posts and gate posts must be set in concrete. The tension of the fabric and the weight of the gate will pull unset posts out of plumb within the first season. Line posts in sandy or loose soil should also be set in concrete. Line posts in dense clay or compacted soil can be driven with a post driver or set in tamped gravel without concrete in mild climates where frost heave is not a concern. In cold climates with freeze-thaw cycles, concrete is recommended for all posts because the frost heave will lift a post set in gravel or soil regardless of how firmly it is tamped.
How do I install a chain link fence on a slope?
There are two methods. The racked method steps the fabric down the slope by cutting the fabric at an angle at each post so the diamonds follow the slope. The top rail and the fabric follow the contour of the ground. The biased method keeps the top rail and the fabric level and fills the gap at the bottom with additional fabric or with the tension wire pulled up to close the gap. Racked installation follows the ground and looks better on a sloped yard. Biased installation is faster and is acceptable when the slope is slight or when the area beneath the fence does not need to be fully enclosed.
Can I add privacy slats after the fence is installed?
Yes. Privacy slats are vertical strips of plastic or aluminum that weave through the chain link diamonds. They install after the fence is complete and do not require disassembling any part of the fence. Slats cost $1 to $2 per linear foot of fence height. For a 100-foot, 4-foot-tall fence, privacy slats add $400 to $800. The slats reduce wind load on the fence compared to a solid privacy fence, which means the chain link posts do not need to be upgraded to support the slats.