

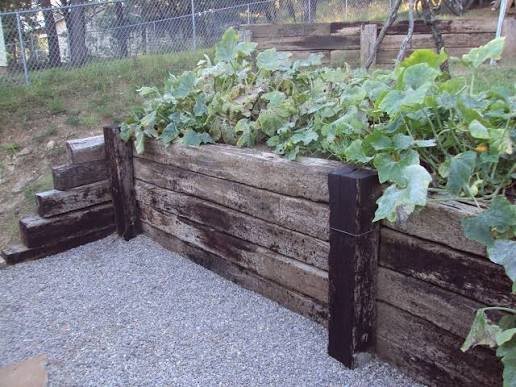
Building a cross tie retaining wall is the project that introduces most homeowners to heavy timber construction. Cross ties, also called railroad ties or landscape ties, are the large rectangular timbers sold at home centers and lumber yards, typically seven by nine inches and eight feet long. They are the material people choose when they want a retaining wall that looks more substantial than concrete block and costs less than natural stone. A cross tie wall is heavy, permanent, and has a texture that manufactured materials cannot replicate. It is also the heaviest retaining wall material you can buy without ordering from a quarry.
Cross ties are laid horizontally in courses, each course pinned to the course below with steel rebar or timber screws. Deadman ties run perpendicular to the wall face back into the hillside to anchor the wall against soil pressure. The back face of the wall is protected from moisture by a gravel backfill column and a drain pipe. The front face weathers naturally to a grey-brown color over the first few years and then stays that way for decades. A cross tie wall looks like it belongs in the landscape in a way that a concrete block wall never quite achieves. The trade-off is weight. Each tie weighs 150 to 200 pounds. A 20-foot wall uses roughly a ton and a half of timber. The project is as much about moving heavy things as it is about building.
Step 1: Buy the Right Ties for the Job
Cross ties at home centers are typically new timbers treated with ACQ or copper azole preservative. They are lighter in color, greener in tint, and safe for residential use including near gardens. They cost $25 to $45 each. Reclaimed railroad ties from salvage yards and classified ads are the used version, treated with creosote, darker in color and heavier with a distinct oily smell. They cost $15 to $30 each. The cost savings on reclaimed ties come with two conditions: the creosote will stain anything it touches, and they should not be used near vegetable gardens, ponds, or play areas. For a wall that borders a patio or a lawn where people will sit and walk, new ACQ-treated ties are worth the premium. For a wall at the back of the property holding back a slope that nobody will ever touch, reclaimed ties save money and nobody will notice the creosote smell after the first summer.
Plan on one tie for every eight inches of wall height per eight feet of wall length, plus additional ties for deadman anchors. A three-foot wall 24 feet long uses three courses of three ties each, nine ties for the face, plus four deadman ties, 13 ties total. A four-foot wall of the same length uses six courses plus five deadman ties, 23 ties total. The deadman ties can be shorter than eight feet. A four-foot deadman section is adequate for walls up to four feet tall. Cut a full-length tie into two four-foot deadman sections to get two anchors from one tie.
Step 2: Build With the Horizontal Stacking Method
The horizontal stacking method is the standard for cross tie walls. Ties are laid flat, wide face down, stacked in courses with staggered joints, and pinned together. The first course sits on six inches of compacted angular gravel in a trench deep enough to bury the ties four to six inches. Each course above is set back about half an inch from the course below to create the batter. The stagger between joints is at least two feet. A continuous vertical seam through multiple courses creates a hinge line where the wall can buckle.
Drill two holes through each tie, five-eighths of an inch in diameter, placed 12 inches from each end. Drive half-inch rebar pins 24 to 30 inches long through the holes into the tie below. The rebar should penetrate at least 12 inches into the lower tie. The pin transfers the lateral load from the retained soil through the wall to the ground. Each course is pinned to the course below before the next course is laid. The pins in the lowest course extend into the compacted gravel and soil below the wall, locking the base of the wall to the ground.
Install deadman ties every six to eight feet and every other course. The deadman runs perpendicular to the wall face, buried in the backfill. The deadman anchors the wall to the earth behind it. Pin the deadman to the course below and the course above at the wall face. Backfill behind each course with angular gravel as you build, compacting in lifts. The gravel column must be at least 12 inches wide. Install a perforated drain pipe behind the first course, wrapped in landscape fabric, and daylight it out the end of the wall.
Step 3: Alternative Method — Vertical Post Wall for Low Retaining
For walls under two feet, a vertical post wall is faster to build than horizontal stacking. Set cross ties vertically in the ground like fence posts, buried two to three feet deep in concrete or compacted gravel. The ties are spaced two to three inches apart, side by side, with their wide faces facing outward. The wall is a row of vertical timbers standing shoulder to shoulder. No stacking. No pinning. No deadman anchors. The buried depth of each post resists overturning. The close spacing resists soil from pushing through the gaps.
A vertical post wall uses more ties per linear foot than a horizontal wall because each tie covers only seven inches of wall face instead of eight feet. A 12-foot vertical post wall two feet tall uses roughly 20 ties. The same wall built horizontally uses four ties. The vertical method is reserved for situations where the speed and simplicity of setting posts outweighs the higher material cost: short walls, curved walls where cutting horizontal ties would be time-consuming, and walls where the rustic look of vertical timbers is preferred over the stacked look.
Dig a trench 24 to 30 inches deep along the wall line. Set each tie in the trench, check plumb, and backfill with gravel or concrete around the base. Allow the concrete to cure before backfilling behind the wall. The exposed height of the ties above ground is the wall height. Cut the tops of the ties to a uniform height after installation, or leave them uneven for a more rustic appearance. A vertical post wall with staggered top heights looks deliberately rustic. A vertical post wall with uniform top heights looks more finished.
Step 4: Know When Cross Ties Are the Right Choice
Cross ties occupy a specific position in the retaining wall material spectrum. They are less expensive than natural stone, more substantial than landscape timbers, and easier to work with than poured concrete. They are heavier than segmental block and require more tools and more physical effort. The right material for a specific project depends on the wall height, the budget, and the desired appearance.
| Material | Cost per sq ft of wall face | DIY Difficulty | Lifespan | Best For |
| Landscape timbers (3×5) | $3–$6 | Easy | 10–15 yr | Low garden walls under 2 ft |
| Cross ties (7×9) | $6–$12 | Moderate–Heavy | 25–40 yr | Walls 2–4 ft, rustic aesthetic |
| Segmental concrete block | $8–$15 | Moderate | 30+ yr | Walls 2–4 ft, clean aesthetic |
| Dry-stacked natural stone | $12–$25 | Hard | 100+ yr | Walls 2–4 ft, natural aesthetic |
| Poured concrete (formed) | $20–$40 | Hard+ | 50+ yr | Walls 4+ ft, engineered |
Frequently Asked Questions
What is the difference between a cross tie and a railroad tie?
There is no difference in the dimensions or the wood. The terms are used interchangeably. “Cross tie” and “railroad tie” refer to the same seven-by-nine-inch by eight-foot timber. “Cross tie” is the term more commonly used at home centers and lumber yards for new pressure-treated timbers. “Railroad tie” more often refers to reclaimed ties that were actually used under railroad tracks. The material is the same. The treatment may differ. New cross ties from a home center are treated with ACQ. Reclaimed railroad ties are treated with creosote. When buying, check the treatment, not the name on the sign.
Is a cross tie wall a good first retaining wall project?
A cross tie wall under three feet is a reasonable first retaining wall project for someone who is physically capable of moving 150-pound timbers and comfortable using a drill, a chainsaw, and a sledgehammer. The construction is simpler than natural stone and the materials are easier to handle than poured concrete. The weight of the ties is the limiting factor. If you cannot safely move a 150-pound tie by yourself, you will need a helper or a machine. A segmental block wall is a better first project for a solo builder because the blocks weigh 40 to 80 pounds each. A cross tie wall is a better first project for someone who wants the finished wall to look like it was built 50 years ago.
Do I need a permit for a cross tie retaining wall?
Most municipalities require a permit for retaining walls over three to four feet tall, regardless of the material. Cross ties are treated the same as any other retaining wall material by building departments. The permit requirements are based on the wall height and location, not on the material. Check with your local building department before buying ties. A cross tie wall is heavy and permanent. Removing one because it was built without a required permit is a significantly larger project than building it was.
The Bottom Line
A cross tie retaining wall is a stack of heavy timbers pinned together with steel, anchored into the hillside with deadman ties, and protected from water by gravel and a drain pipe. The ties are the structure. The pins are the connections. The deadmen are the anchors. The gravel is the drainage. The wall is heavy because it needs to be heavy to hold back the soil. The weight is the wall’s greatest asset and its greatest challenge during construction. Move each tie once. Plan where it goes before you lift it. The wall that takes two weekends and a helper to build will outlast the deck, the fence, and possibly the roof. Cross ties are not the fastest wall material or the cheapest or the lightest. They are the material that looks like it has been holding back the hillside since before the house was built, and in 30 years, it will be hard to tell that it has not.