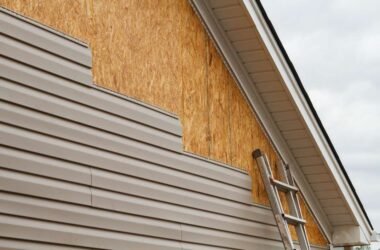


Installing vinyl siding is more than hanging panels. The panels are the visible part. The flashing around windows and doors, the trim that receives the panel ends, and the soffit that closes the eaves are the parts that keep water out of the wall. A vinyl siding installation can look perfect from the street and leak water into the wall at every window because the flashing was done wrong. The panels shed rain. The flashing directs water away from the openings. The trim hides the gaps. The soffit ventilates the attic. All four systems must work together.
The previous guide covered the basics: starter strip, J-channel, nailing technique, and panel overlap. This guide covers what happens at the openings, at the roof line, and under the eaves. These are the details that separate a siding job that keeps the house dry for 30 years from one that looks good for five and rots the sheathing underneath.
Flashing Windows and Doors Before the Siding Goes On
Window and door flashing is installed before any siding trim. The flashing is the waterproof layer that directs water that gets behind the siding back out to the surface. The sequence is: house wrap over the sheathing, flashing tape or metal flashing around the window, then J-channel or trim around the window, then siding. The house wrap at the bottom of the window must be cut and folded so water running down the wall behind the siding is directed out over the bottom flange of the window, not behind it. The flashing tape goes on the bottom first, then the sides overlapping the bottom, then the top overlapping the sides. The sequence matters. Water runs downhill. Every layer must overlap the layer below it so water is directed outward at every step.
J-channel around windows receives the cut ends of the siding panels. The channel must be installed with the bottom piece first, then the sides overlapping the bottom, then the top piece that spans the full width of the window and overlaps the side pieces. The top piece of J-channel must have the ends notched and folded down to create a drip edge that directs water into the side channels. Without the drip edge, water running down the top J-channel flows around the corner and behind the side J-channel, directly into the wall. The drip edge is a small detail that takes 30 seconds per window and prevents a leak that will rot the sheathing over the course of several years without ever being visible from the outside.
Gable Ends: Siding the Triangular Wall Under the Roof
The gable end is the triangular wall section under a peaked roof. Vinyl siding on a gable end is installed the same way as on a rectangular wall, except the top course of each row is cut at an angle to match the roof pitch. The angle cut must leave a quarter-inch gap between the siding and the J-channel or utility trim at the roofline. The gap allows for expansion and is hidden by the trim.
Measure the angle of the gable with a level and a framing square, or by holding a piece of scrap siding against the roof line and marking the angle. Cut a template piece first and test-fit it. Use the template to mark the remaining panels. Each course up the gable is slightly shorter than the one below it because the wall narrows toward the peak. Measure each course individually. Do not assume the roof pitch is perfectly consistent. Roofs sag slightly over time, and the angle at the peak may differ from the angle at the eaves by a degree or two. A template cut at the bottom may not fit at the top.
At the peak of the gable, the last piece of siding is a small triangle. Cut it carefully. The peak is the most visible part of the gable from the ground. A sloppy peak cut draws the eye. A clean peak cut disappears. Install the peak piece with a snap-lock punch if the cut edge needs to engage utility trim, or use construction adhesive to secure it if the piece is too small to nail.
Soffit and Fascia: Closing the Eaves
Soffit is the horizontal surface under the roof overhang. Vinyl soffit panels are vented or solid, installed perpendicular to the house wall, and received by F-channel or J-channel nailed to the wall and the fascia board. The soffit goes on after the siding is up to the top of the wall but before the final trim at the roofline.
Install F-channel or J-channel along the wall at the height where the soffit will meet the wall, and along the fascia board at the outer edge of the eave. The channels face each other. Measure the distance between the channels at each end and in the middle. The eave width is rarely perfectly consistent. Cut each soffit panel to fit the measured gap minus a quarter inch for expansion. The panels snap into the channels. If the eave is wider than a single soffit panel, panels can be joined with an H-bar or overlapped and fastened at the overlap. Vented soffit panels provide attic ventilation. The vent openings face down, not up. Solid soffit panels are used where the attic is ventilated through the gable ends or a ridge vent.
Fascia covers the vertical face of the eave. Vinyl fascia is installed over the existing wood fascia board, covering it completely. The fascia cap snaps over the top edge of the fascia board and the bottom edge clips into a utility trim or is nailed at the bottom. Fascia must be installed so water running off the roof drips clear of the fascia. The drip edge at the roof line should extend past the fascia by at least half an inch.
Frequently Asked Questions
Why does water leak around windows after vinyl siding is installed?
The leak is almost always in the flashing, not the siding. Vinyl siding is not waterproof. It is a rain screen. Water that gets behind the siding is supposed to run down the house wrap and exit at the bottom of the wall. If water is leaking into the house around a window, the window flashing was not installed correctly before the siding went on, or the house wrap at the window was not properly integrated with the window flange. The fix requires removing the siding around the window, correcting the flashing, and reinstalling the siding. The siding itself is not the cause of the leak.
How do I cut vinyl siding for a gable end?
Measure the angle of the roof with a level held against the underside of the roof sheathing or the fascia. Transfer the angle to the siding panel. Cut with tin snips or a circular saw with a backward fine-tooth blade. Cut a test piece first. Use the test piece as a template. Measure each course individually because the wall width decreases as you move up the gable. Leave a quarter-inch gap between the cut edge and the J-channel at the roofline.
Should soffit be installed before or after the siding?
Soffit is installed after the siding reaches the top of the wall but before the final trim at the roofline. The siding stops at the bottom of the F-channel that receives the soffit. The soffit panels go in next. The fascia covers the outer edge last. The sequence is: siding up to the eave, F-channel on the wall and fascia board, soffit panels, then fascia cover.
The Bottom Line
Vinyl siding is a wall system, not a surface covering. The flashing around windows directs water out. The J-channel receives the siding ends and hides the gaps. The gable end requires angled cuts that account for roof pitch and expansion. The soffit closes the eaves and ventilates the attic. Each part of the system depends on the part below it being installed correctly. A siding job that looks great from the street but leaks at the windows will rot the sheathing in five years. The flashing is invisible after the siding is up. It is also the part that keeps the house dry. Spend the time on the flashing. The siding will cover it, and the wall behind it will stay dry for decades.