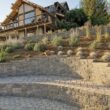


Building a railroad tie retaining wall is the heaviest retaining wall project a homeowner can tackle without heavy equipment. Each tie weighs 150 to 200 pounds and measures roughly seven by nine inches by eight feet long. A four-foot wall 20 feet long uses roughly 20 to 25 ties, totaling two to three tons of wood. Moving a single tie by hand requires two people or one person with a strong back and a healthy disregard for the limits of their spine. Moving 20 ties requires planning, leverage, and a willingness to accept help. The reward is a wall with a rugged, substantial presence that no manufactured block can match. A railroad tie wall looks like it was built to hold back a mountain. If it was built correctly, it will.
Railroad ties are the original heavy timber retaining wall material. They are dense, treated to resist rot and insects, and dimensionally consistent enough to stack like oversized bricks. The ties are laid horizontally, each course set back slightly from the course below to create the batter. Deadman ties, full-length ties that run perpendicular to the wall face back into the hillside, anchor the wall to the earth behind it. Steel rebar or spikes are driven through holes drilled in the ties to pin each course to the course below. The result is a solid timber mass that resists the lateral pressure of the soil through its own weight, through the deadman anchors, and through the mechanical connection of the pins. It is the timber equivalent of a reinforced concrete wall, built with wood and steel instead of block and rebar.
Step 1: Source the Ties and Gather Materials
Railroad ties come in two types: used and new. Used ties are the ones pulled from actual railroad tracks. They are saturated with creosote, a coal-tar preservative that smells like asphalt, stains anything it touches, and should not be used near vegetable gardens, ponds, or anywhere children will play. The creosote is what makes them last 30 years in the ground. It is also what makes them a material you handle with gloves and long sleeves. New ties are treated with ACQ or copper azole, the same preservatives used in pressure-treated lumber. They are lighter in color, do not seep creosote, and are safe for residential use including near gardens. They cost more. A used tie costs $15 to $30. A new tie costs $25 to $45. The cost difference for a 20-tie wall is $200 to $300. The creosote on your hands, clothes, and soil is permanent.
Materials for a four-foot-high wall 20 feet long: 20 to 25 ties depending on whether deadman ties are counted separately or cut from the same stock, 30 to 40 half-inch-diameter rebar pins 24 inches long, a masonry drill bit long enough to drill through seven inches of tie, a chainsaw with a sharp chain for cutting ties to length, a digging bar, a level, and a sledgehammer for driving the pins. The gravel for the base and backfill is the same as for any retaining wall: angular gravel, six inches for the base and 12 inches minimum behind the wall, plus a perforated drain pipe at the base. The ties are cut to length with a chainsaw. A circular saw will not cut through a seven-by-nine-inch tie in a single pass. A chainsaw will, and it will also throw creosote-laden sawdust everywhere. Wear eye protection, a dust mask, and clothes you do not care about.
Step 2: Prepare the Base and Set the First Course
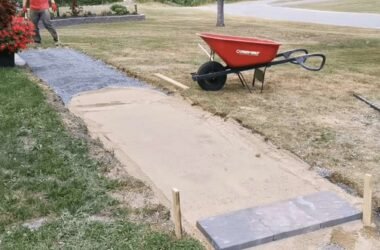
The first course of ties is buried at least four to six inches below grade and sits on six inches of compacted angular gravel. Dig a trench wide enough for the tie plus at least 12 inches of gravel backfill behind it, roughly 24 to 28 inches wide. For a wall with deadman ties extending back into the hillside, the trench at the deadman locations must extend farther back to accommodate the full length of the deadman. The bottom of the trench must be level along its entire length. Like every retaining wall, the base determines whether the wall stands straight for 30 years or leans after two winters.
Lay the first course of ties end to end, butted tightly together, on the compacted gravel. Check level in both directions on every tie. The ties are heavy enough that they will settle into the gravel under their own weight, but tapping them with a sledgehammer and a block of wood helps seat them fully. The first course must be perfectly level and straight. Run a string line along the front face and adjust each tie until it touches the string without pushing it.
Drill two half-inch holes through each tie, one near each end, roughly 12 inches from the ends. Drive 24-inch rebar pins through the holes into the gravel and soil below. The pins lock the first course to the ground. Without pins, the entire wall can slide outward at the base under the pressure of the soil behind it. The pins are the shear connection between the wall and the earth. Drill the holes slightly larger than the rebar, five-eighths of an inch, so the rebar drives through without binding. If the hole is too tight, the rebar will seize halfway through and you will have to cut it off and drill a new hole.
Step 3: Stack Courses With Deadman Anchors
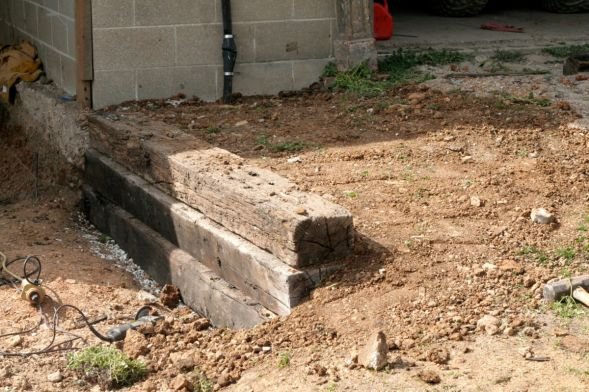
The second course sits on top of the first, set back approximately one-half to one inch from the front face of the tie below to create the batter. The joints between ties in the second course must be staggered from the joints in the first course by at least two feet. A continuous vertical seam between two ties creates a hinge line where the wall can buckle. Staggered joints distribute lateral loads across multiple ties.
Drill holes through the second course and drive rebar pins through into the first course below. The pins should penetrate at least 12 inches into the tie below. If the hole alignment is off and the rebar hits the tie below at an angle, it will split the tie. Drill straight and measure the pin locations from a consistent reference point on each tie so the holes in each course align with the holes in the course below.
Install deadman ties at every other course and every six to eight feet along the wall. A deadman is a full-length tie, or a shorter section at least four feet long, that runs perpendicular to the wall face. One end of the deadman is visible in the wall face. The other end extends back into the hillside, buried in the gravel backfill and native soil. The deadman is the structural connection between the wall and the earth. The weight of the soil and backfill above the deadman anchors it in place, and the deadman anchors the wall. Pin the exposed end of the deadman to the tie course below and the course above just like any other tie. The deadman must be level or tilted slightly downward toward the back so that soil pressure pushes it down into the earth rather than lifting it out.
Backfill behind each course with angular gravel, compacted as you build. The gravel column must be at least 12 inches wide between the back of the ties and the native soil. Install a perforated drain pipe behind the first course, wrapped in landscape fabric. The drainage principles are identical to every other retaining wall. The ties are wood, and wood in constant contact with wet soil rots, creosote or not. The gravel backfill and drain pipe keep the ties as dry as possible on their buried face.
Step 4: Cap the Wall and Manage the Top
The top course of ties is the cap course. Unlike stone walls where the cap is a separate stone set on top, the top course of a railroad tie wall is the cap. Select the straightest, least damaged ties for the top course. Pin them to the course below. The top course is the most visible course. Ties with large cracks, splits, or heavy creosote bleeding should be used in the lower courses where they will be buried or less visible.
Grade the soil behind the wall to slope away from the top of the wall for at least four feet. This directs surface water away from the backfill. If the wall is on a hillside with significant runoff from above, install a swale uphill of the wall. The swale is a shallow gravel-filled trench that intercepts surface water before it reaches the wall. Railroad ties are more vulnerable to water damage than stone or concrete because they are wood. Keeping the backfill drained and the surface water diverted extends the wall’s life by a decade or more.
Inspect the wall in the spring after its first winter. Tighten any loose pins. Replace any ties that have shifted out of alignment. The wall will settle slightly as the ties compress into the gravel base and the backfill consolidates. Minor settlement is normal. A tie that has moved more than an inch out of line needs to be reset. The wall will stabilize after the first year and require only occasional inspection after that.
Frequently Asked Questions
Are railroad ties safe to use for a retaining wall?
Used railroad ties treated with creosote are safe for retaining walls that are not near vegetable gardens, ponds, streams, or areas where children play. Creosote is a coal-tar preservative that can leach into soil and water over time. The EPA classifies creosote as a probable human carcinogen. The risk from a retaining wall where you are not growing food or touching the ties regularly is low. The risk from a wall next to a vegetable garden where creosote can migrate into the root zone of edible plants is higher and should be avoided. New ties treated with ACQ or copper azole do not contain creosote and are safe for all residential uses including near gardens. If you are unsure which treatment your ties have, assume creosote and keep them away from food plants and water sources.
How tall can I build a railroad tie retaining wall?
A railroad tie wall built with deadman anchors and pinned courses can reach four feet without engineering. Above four feet, the lateral soil pressure requires a structural design that includes deeper deadmen, closer spacing, and possibly a tiered wall system. The weight of the ties actually helps at greater heights because the wall’s mass resists overturning better than a lighter block wall. But the deadman anchors are the limiting factor. At six feet of retained height, the deadmen must extend six to eight feet into the hillside and be spaced every four feet. A wall of that scale should be designed by an engineer. For a DIY project, keep the wall at four feet or under, or build two shorter walls with a terrace between them.
How long does a railroad tie retaining wall last?
A properly built railroad tie wall with drainage, deadman anchors, and creosote-treated ties lasts 25 to 40 years. New ties treated with ACQ last 15 to 25 years. The lifespan depends primarily on drainage. Ties that sit in saturated backfill will rot from the back face regardless of the preservative treatment on the front face. The gravel backfill and drain pipe are the components that determine the wall’s lifespan. A wall with perfect drainage and creosote ties may outlast the house it was built next to. A wall with no drainage and ACQ ties may need replacement in 10 years.
The Bottom Line
A railroad tie retaining wall is two tons of treated wood stacked in courses, pinned together with steel rebar, and anchored to the hillside with deadman ties buried in the backfill. The ties are heavy. The pins require drilling through seven inches of dense wood. The deadmen require excavating into the hillside far enough to bury a full-length tie. The work is physical in a way that stacking segmental blocks is not. But the finished wall has a mass and a permanence that lighter materials cannot match. It looks like infrastructure. It is infrastructure. The wall that takes two weekends and a borrowed chainsaw to build will still be holding back the same hillside when the next owner of the house is wondering whether to paint the living room.