


Installing a paver walkway is the project that turns a dirt path worn into the lawn into a finished hardscape that looks like it was always there. The pavers sit on a compacted gravel base, bedded in a layer of sand, and locked together with polymeric sand swept into the joints. No concrete. No mortar. The walkway floats on the base as a flexible surface that moves with freeze-thaw cycles without cracking. A three-foot-wide walkway running 30 feet from the driveway to the front door costs $800 to $1,500 in materials and takes a two-person team a weekend to install. The same walkway installed by a contractor costs $2,500 to $4,500. The difference is digging, lifting, and being on your hands and knees for two days.
The process is the same whether the walkway is straight or curved, short or long. The only things that change are the number of pavers and the number of cuts. The base preparation is the same regardless of the paver pattern you choose. The base is the part that determines whether the walkway still looks level in five years or develops a dip where water pools every time it rains. The base is the part you cannot see when the project is done. The base is the part that matters most.
Step 1: Plan the Layout and Calculate Materials
Lay out the walkway path with two garden hoses or a rope. Walk the path. Adjust the curves until they feel natural underfoot. A walkway that looks graceful from the kitchen window but forces you to take an awkward step to stay on the pavers is a walkway designed from the wrong perspective. Mark the final path with spray paint along both edges of the hose. The width of a walkway should be at least three feet for a single person to walk comfortably and four feet for two people to walk side by side. Narrower than three feet feels like a balance beam. Wider than four feet starts to feel like a patio.
Calculate materials. Measure the total square footage: length multiplied by width. Add ten percent for cuts and waste, fifteen percent for curved walkways where cuts are more frequent. For a 30-foot walkway three feet wide, that is 90 square feet plus 10 percent, roughly 100 square feet. Pavers cover roughly four to five square feet per square foot of paver depending on the pattern and the paver size. A standard four-by-eight-inch paver in a running bond pattern covers about 4.5 pavers per square foot. A 100-square-foot walkway needs roughly 450 pavers. Order 475 to account for breakage and miscuts.
The base materials: angular gravel for the base course, four to six inches deep. A 100-square-foot walkway with a five-inch gravel base needs roughly 1.5 tons of gravel. Concrete sand for the bedding layer, one inch deep, roughly half a ton. Edge restraints for both sides of the walkway, total length equal to twice the walkway length plus the ends. Polymeric sand for the joints, one 50-pound bag covers roughly 50 to 75 square feet depending on joint width. Rent a plate compactor for the gravel and a masonry saw for cutting pavers.
Step 2: Excavate and Prepare the Base
Excavate the walkway path to a depth of seven to nine inches below the finished paver surface. The depth equals four to six inches of gravel base, one inch of sand bedding, and the thickness of the pavers themselves, typically two to three inches. Dig the trench wider than the walkway by six inches on each side to allow room for the edge restraints. That extra width gets backfilled with soil after the edging is installed. Slope the bottom of the excavation away from the house or toward a drainage area. A quarter-inch of fall per foot of width is standard. A three-foot-wide walkway should drop three-quarters of an inch from one side to the other. The slope keeps water from pooling on the pavers.
Compact the exposed soil with a plate compactor. Do not skip this step. Uncompacted soil under the gravel base settles over time, and the gravel above it settles with it, and the pavers above the gravel develop a dip exactly where you did not compact. Fill the trench with angular gravel in two to three lifts. Spread the first two inches of gravel, compact, spread the next two inches, compact, and continue until the gravel base is at the correct height. The top of the compacted gravel should be at the depth where the sand bedding layer will bring the pavers to finished grade. Check the slope with a level and a string line. The gravel base is the last chance to fix a slope problem. Once the sand goes down, you are committed.
Step 3: Screed the Sand and Lay the Pavers
Place one-inch-diameter pipes or screed rails on top of the compacted gravel along both edges of the walkway. The pipes set the thickness of the sand layer. Spread concrete sand over the gravel between the pipes. Drag a straight two-by-four across the pipes to screed the sand perfectly flat and at the correct thickness. Remove the pipes and fill the voids they left with sand, smoothing the surface by hand. Do not walk on the screeded sand. The surface is now ready for pavers. Every footprint in the sand is a low spot in the finished walkway.
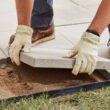
Start laying pavers at a fixed edge, typically along the house, a driveway, or an existing hardscape that provides a straight reference line. If there is no fixed edge, snap a chalk line and start there. Lay pavers in the chosen pattern. The running bond pattern, where each paver is offset by half its length from the paver below it, is the simplest and strongest. It requires the fewest cuts and hides small alignment imperfections better than a stacked pattern. Place each paver gently on the sand. Do not slide it into position. Sliding pushes sand into the joint ahead of the paver and creates an uneven surface.
Check level frequently. Place a four-foot level across multiple pavers and look for high or low spots. Tap high pavers down with a rubber mallet. Lift low pavers and add a small amount of sand underneath. The adjustments are small. A tablespoon of sand under one corner is often enough. Work from the laid pavers outward so you are always standing on the pavers, not the sand. For curved walkways, lay the full pavers first and leave the edge cuts for later. Cutting as you go breaks the rhythm and makes it harder to keep the pattern straight.
Step 4: Cut Edge Pavers and Install Edge Restraints
Mark the pavers that need to be cut along the curved edges. A paver that overhangs the spray-painted edge line needs to be trimmed. Mark each paver individually with a pencil or chalk. Do not assume all edge pavers need the same cut. Curves are not uniform and the cut line changes slightly with each paver. Cut the marked pavers with a masonry saw. A wet saw keeps the dust down and produces cleaner cuts. A dry saw with a diamond blade works but creates a cloud of silica dust. Wear a respirator rated for silica, not just a dust mask. Silica dust from cutting pavers is a serious respiratory hazard.
Install edge restraints along both sides of the walkway after all pavers are laid and cut. Plastic or metal paver edging sits against the outside edge of the pavers and is anchored to the gravel base with 10-inch spikes driven through the edging into the gravel. The edging holds the pavers in place laterally. Without it, the outer pavers shift outward over time under foot traffic and freeze-thaw cycles, and the gaps between pavers widen until the walkway looks like a jigsaw puzzle that has been shaken. Install the edging tight against the pavers and spike it every 12 inches.
Step 5: Sweep Polymeric Sand and Compact
Polymeric sand is a mixture of fine sand and polymer binders that harden when wet. It locks the pavers together and prevents weeds from growing in the joints. Spread the sand over the walkway and sweep it into the joints with a push broom. Sweep in multiple directions. The joints must be completely filled. The sand should sit just below the surface of the pavers, not flush with the top. If the sand sits flush with the paver surface, it will bond to the paver faces when wet and leave a haze that is nearly impossible to remove.
Run a plate compactor over the pavers. Place a rubber mat or a piece of carpet between the compactor plate and the pavers to prevent the steel plate from scratching the paver surface. The compactor vibrates the sand deeper into the joints and settles the pavers into the sand bedding. Sweep additional polymeric sand into any joints that are no longer full after compaction. Repeat the sweeping and compacting until the joints stay full after compaction.
Remove all excess sand from the paver surface. Use a leaf blower to blow every grain of sand off the pavers. Polymeric sand left on the surface bonds to the pavers when wet and creates a permanent cloudy haze. The blower is not optional. It is the step that determines whether the finished walkway looks like pavers or like pavers covered in dried glue. After the surface is completely clean, mist the walkway lightly with a garden hose. The water activates the polymer. Do not power-wash or flood the walkway. A light mist is enough. The sand sets within 24 hours. Keep foot traffic off the walkway for at least 24 hours while the polymer cures.
Frequently Asked Questions
How deep do I need to dig for a paver walkway?
Dig seven to nine inches below the finished paver surface. The depth breaks down as four to six inches of compacted gravel base, one inch of concrete sand bedding, and the thickness of the pavers, typically two to three inches. Walkways that will receive only foot traffic can use a four-inch gravel base. Walkways that may occasionally bear the weight of a vehicle, such as a walkway that crosses a driveway apron, need a six-inch gravel base compacted in two or three lifts. The extra two inches of gravel adds roughly $50 to a 100-square-foot project and prevents the pavers from sinking under a car tire.
What is the best paver pattern for a walkway?
A running bond pattern, where each paver is offset by half its length from the paver in the row below, is the strongest and simplest pattern for a walkway. It requires the fewest cuts, hides small alignment errors better than stacked or grid patterns, and distributes loads across multiple pavers. Herringbone patterns are stronger for driveways because they interlock in two directions and resist the turning forces of car tires. For a walkway, herringbone uses more pavers per square foot and requires significantly more cuts. The extra strength is unnecessary for foot traffic. Running bond is the right choice for almost every walkway project.
Should I use sand or mortar between pavers on a walkway?
Polymeric sand is the standard for walkways. It is easier to install than mortar, allows the walkway to flex with freeze-thaw cycles without cracking, and can be replenished if it erodes out of the joints over time. Mortar joints are rigid and will crack if the base underneath shifts. Mortar is used for pavers set on a concrete slab, not on a flexible gravel base. For a walkway built on the gravel-and-sand base described in this guide, polymeric sand is the correct choice. Sweep it in, compact, sweep again, blow off the excess, and mist lightly with water.
The Bottom Line
A paver walkway is a gravel base, a sand bed, and a layer of pavers locked together with polymeric sand. The gravel base is the structural part. Dig deep enough. Compact in lifts. Get the slope right. The sand is the adjustment layer. Screed it flat. Do not walk on it. The pavers are the visible part. Lay them in a running bond. Cut the edges clean. Install edging tight. Sweep in polymeric sand, compact, sweep again, blow off every grain of excess sand, and mist lightly. The walkway that took a weekend to install will still be level and weed-free in ten years. The one that was built on four inches of uncompacted gravel will have a dip in it by spring. The difference is patience with the plate compactor and a leaf blower at the end.