

Building a retaining wall on a hillside is a different project from building one on a gentle slope. The hillside is steeper, the soil wants to move downhill while you are digging into it, and the forces the wall must resist are larger. A slope of 10 or 15 degrees is manageable with a single wall. A hillside of 25 or 30 degrees is a different conversation. The wall is higher, the drainage demands are greater, and the access for materials and equipment becomes a problem before the first block is laid. On a steep hillside, the question is not just how to build the wall. It is whether to build one wall or several, where to put the excavated soil, and how to keep the hillside stable while the trench is open.
The physics are the same as any retaining wall: the wall holds back soil, drainage prevents water pressure from building behind it, and setback leans the wall into the hill. What changes on a hillside is the scale. A four-foot wall on a steep hillside is holding back soil that extends uphill for 20 or 30 feet, not just the four feet directly behind the wall. The volume of soil retained is larger, which means the water volume is larger, which means the drainage system must handle more flow. A hillside also concentrates surface water. Rain that falls on the slope above the wall runs downhill and pools behind the wall if there is no diversion. The drainage system behind the wall is necessary. The drainage system above the wall is equally necessary and often overlooked.
Step 1: Assess the Hillside — One Wall or Several
Measure the total grade change from the bottom of the planned wall to the highest point you want the wall to retain. Multiply the horizontal distance by the slope percentage to get the vertical drop. A hillside that rises 12 feet over a 30-foot horizontal distance has a 40 percent slope, roughly 22 degrees. A single segmental block wall can manage three to four feet of retained height without engineering. A 12-foot grade change on a 40 percent slope needs either multiple terraced walls or a single engineered wall with geogrid reinforcement, deadman anchors, and a structural design signed off by an engineer.
Multiple terraced walls are the standard DIY approach for steep hillsides. Two four-foot walls with a terrace between them hold back eight feet of grade change. Three four-foot walls hold back twelve feet. Each wall is a manageable height. The terrace between walls provides flat, usable space and reduces the volume of soil each wall must retain. The upper wall must be set back from the lower wall by at least twice the height of the lower wall. For a four-foot lower wall, set the upper wall at least eight feet back. This prevents the upper wall’s load from transferring into the soil retained by the lower wall and overloading it.
Walk the hillside and identify where surface water flows during rain. Look for existing drainage paths, erosion channels, and areas where water pools. The wall should not block these paths. Build the wall around them or install surface drains above the wall to divert water around the ends. A wall built across a natural drainage path without a diversion becomes a dam. The water pools behind it, saturates the backfill, and pushes the wall out. The hillside will route water downhill regardless of what you build in the way. Work with the drainage, not against it.
Step 2: Solve Access and Excavate Safely
Access is the hardest part of hillside construction. The materials for a 30-foot wall weigh two to three tons. Moving them up a steep hillside by hand is a project within the project. If the hillside is accessible from the top, bring materials in from above and stage them on the flat area behind the planned wall. If accessible only from the bottom, carry materials up or rent a small tracked loader. A mini skid steer with a bucket attachment rents for $200 to $400 per day, fits through a 36-inch gate, and will carry a pallet of blocks up a 25-degree slope in minutes instead of hours. The rental cost is less than the chiropractor bill.
Excavate the hillside in steps, not all at once. Cutting a continuous trench across a steep slope removes the soil that is holding the hillside above it in place. A trench that is open for several days during rain can trigger a small slide that takes the trench and everything below it downhill. Excavate one section at a time. Build the wall in that section including the drainage and backfill before moving to the next section. This limits the amount of unsupported hillside at any given time. On very steep slopes, drive temporary stakes or install erosion control blankets above the excavation area to hold the surface soil in place while you work.
Where does the excavated soil go? On a flat site, it piles up next to the trench and gets backfilled behind the wall. On a hillside, it wants to roll downhill. Have a plan for the spoils before you start digging. Haul it uphill to fill the terrace behind the wall, spread it on a low area of the property, or rent a disposal bin. Do not pile excavated soil at the top of the slope above the wall. Adding weight above a retaining wall increases the load the wall must resist and can trigger a slope failure during construction.
Step 3: Build the Base and Drainage System
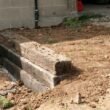
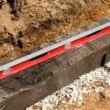
The base trench on a hillside must be cut level into the slope. The uphill side of the trench will be deeper than the downhill side because you are cutting into ground that rises. Excavate until the bottom of the trench is level across its entire width. The depth at the back of the trench, against the hillside, will be several inches deeper than the depth at the front. This is correct. The trench floor is level. The ground above it is not.
Fill the trench with six inches of angular gravel and compact it. Place the first course of blocks, checking level in both directions. The first course on a hillside wall should be buried four to six inches on the downhill face. On the uphill side, the blocks will be buried deeper because the trench is deeper into the hillside. The top of the blocks stays level. The buried depth varies. This is the same principle as a slope wall, but the variation is larger on a steep hillside.
Install a perforated drain pipe behind the first course at the base of the wall. On a hillside, the drain pipe must daylight out the end of the wall at a point where water can flow away downhill. If the wall runs across the hillside with no natural end, run the drain pipe through the wall face using a weep hole or a drain outlet at the lowest point of the wall. Wrap the pipe in landscape fabric. Fill behind the wall with at least 12 inches of angular gravel, compacted in lifts. The gravel column on a hillside must handle water from the entire uphill catchment area, not just the soil directly behind the wall. A larger gravel column, 18 to 24 inches wide, provides additional drainage capacity on steep slopes with large uphill catchment areas.
Step 4: Manage Surface Water Above the Wall
This is the step that slope walls can survive without and hillside walls cannot. Surface water running downhill from above the wall will pool behind it, saturate the backfill, and overwhelm the drain pipe during heavy rain. Install a swale, a shallow drainage ditch, or a French drain above the wall to intercept surface water before it reaches the wall. The swale runs parallel to the wall, several feet uphill, and directs water around the ends of the wall to a safe discharge point downhill.
A simple swale is a shallow trench, six to eight inches deep and twelve to eighteen inches wide, lined with landscape fabric, filled with gravel, and sloped at one to two percent toward the discharge point. For larger catchment areas, a solid drain pipe in the swale carries the water. The swale must discharge water onto stable ground where it will not erode a new channel. Discharging onto a paved driveway, into an existing drainage system, or onto riprap-armored ground is acceptable. Discharging onto bare soil at the top of a slope creates a new erosion problem that will eventually undermine the wall from below.
Grade the soil above the wall to slope away from the wall for at least four to six feet. A gentle swale six feet behind the wall catches most surface water before it reaches the backfill. The combination of a surface swale above the wall and the gravel column behind the wall creates a two-stage drainage system. The swale handles surface water. The gravel column handles groundwater that percolates through the soil. On a steep hillside, both stages are necessary. Relying on only the gravel column behind the wall is asking a four-inch drain pipe to handle the runoff from a hillside catchment that might be 500 square feet or more.
Step 5: Stack Courses, Backfill, and Finish
Stack each course on the interlocking lip of the course below. The automatic setback of three-quarters of an inch per course leans the wall into the hillside. On a steep hillside wall, the setback is more critical than on a flat site because the retained soil column is taller and heavier. Check level on every block. A block that is out of level by an eighth of an inch will be out by half an inch five courses up. Stagger the vertical joints in a running bond pattern.
Backfill behind each course with gravel, compact, and lay the next course. Do not use native soil as backfill. Native soil retains water and expands when wet, exerting additional pressure on the wall. The gravel column must extend all the way to the top of the wall. Landscape fabric between the gravel and the native soil prevents the gravel from clogging with silt over time.
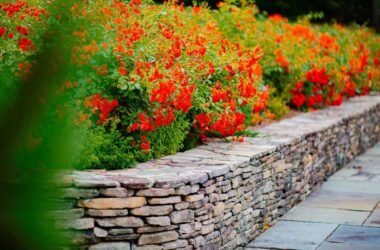
Install cap blocks with construction adhesive. When the wall is complete, grade the area behind the wall to direct water into the swale. Plant the terrace between walls with ground cover or grass to stabilize the soil. The roots hold the surface soil in place and reduce erosion. The wall is now holding back a hillside. The swale is diverting surface water around the ends. The gravel column is draining groundwater to the pipe. Walk away and let the system work.
Frequently Asked Questions
Should I build one tall wall or multiple terraced walls on a steep hillside?
Multiple terraced walls are safer, easier to build, and almost always the better choice for a DIY project on a steep hillside. Each wall is a manageable three to four feet tall. The terraces between walls break up the slope, provide usable flat space, and reduce the load on each individual wall. A single wall retaining more than four feet of soil requires engineering, geogrid reinforcement, and in most jurisdictions a permit. Two four-foot walls with an eight-foot terrace between them accomplish the same grade change, cost roughly the same in materials, and can be built without an engineer.
How do I keep the hillside from eroding while I build the wall?
Work in sections. Excavate, build, and backfill one section before moving to the next. Cover exposed soil uphill of the work area with a tarp or erosion control blanket if rain is forecast. Do not leave an open trench across the entire hillside overnight, especially during wet weather. Install the surface swale above the wall as early in the project as possible so it diverts water before the excavation begins. The swale does not need to be finished. A rough trench with a tarp liner will move water around the work area during construction.
How much does a hillside retaining wall cost compared to a flat-ground wall?
A hillside retaining wall costs 30 to 50 percent more per linear foot than the same wall on flat ground. The additional cost comes from deeper excavation, more gravel for backfill, the surface drainage system above the wall, and equipment rental for material handling. A 30-foot segmental block wall four feet tall costs roughly $1,500 to $2,500 in materials on flat ground. The same wall on a steep hillside with a surface swale and equipment rental costs $2,500 to $4,000. The additional expense is almost entirely in gravel, drainage pipe, and getting the blocks up the hill.
The Bottom Line
A retaining wall on a hillside is the same structure as a wall on a slope, built with more caution. The hillside is steeper, the loads are larger, and the water wants to move downhill through your trench. Build in sections so the hillside stays stable while you work. Install drainage above the wall, not just behind it. Use multiple terraced walls instead of one tall one. Move materials with a machine if the slope is steep enough that carrying blocks by hand is dangerous. The wall will hold back the hillside for decades if the drainage works. The drainage will work if you give the water somewhere to go that is not through the wall. The hillside does not stop pushing. The wall just has to be strong enough, dry enough, and terraced enough to push back.